
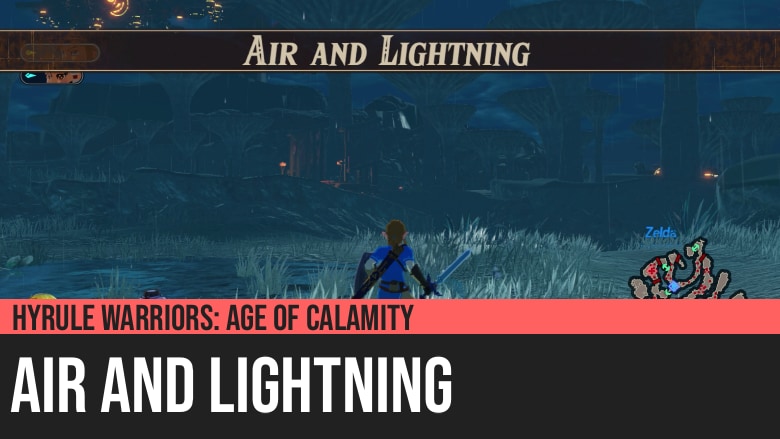
Hyrule Warriors: Age of Calamity - Air and Lightning
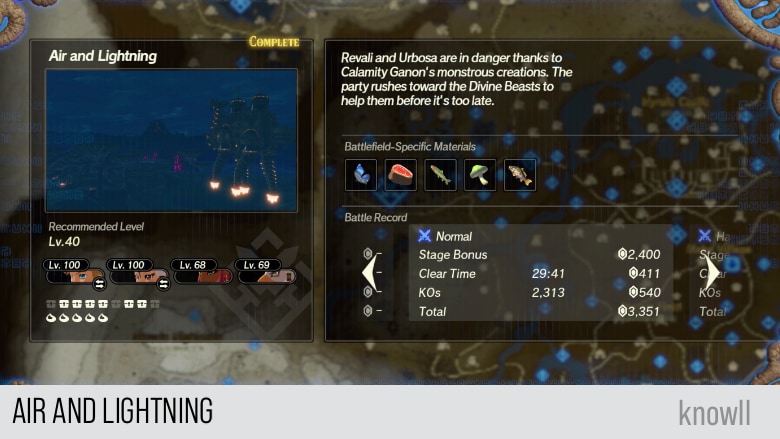
Hyrule Warriors: Age of Calamity - Air and Lightning is the third part of Chapter 5 of the game. Revali and Urbosa are in danger thanks to Calamity Ganon's monstrous creations. The party rushes toward the Divine Beasts to help them before it's too late.
This Chapter entry, together with Water and Fire, is one of the best and most exciting Chapter entries in the whole game. It gives you two excellent boss fights with Thunderblight Ganon and Windblight Ganon while providing two new characters to unlock with Riju and Teba. Also, it's the entry where you first fight specific elemental versions of large enemies like Electric Lynel, Ice Hinox, and Fire Hinox.
Treasure Chests and Koroks
- 5 Koroks
- 9 Treasure Chests
Battlefield-Specific Materials
- Winterwing Butterfly
- Raw Prime Meat
- Voltfin Trout
- Stamella Shroom
- Mighty Carp
Special Rewards
Fate of the Divine Beasts
The time-traveling Guardian contained records with a depiction of the four Divine Beasts falling under the control of Calamity Ganon.
These records also included an image of a scene in the west of Hyrule. With the inevitable revival of this malevolent force, Vah Medoh and Vah Naboris were poised to attack.
Seeing the unmistakable blue lights of Vah Medoh, Zelda held out hope that Revali and Urbosa still stood. Zelda and her party rushed to rescue them while there was still time...
Rescue Across Time: Wind and Thunder
Revali and Urbosa are both locked in pitched battles against the powerful phantoms Calamity Ganon created. Just as all seems lost, however, mysterious figures from the most unlikely of places arrive to save them.
Riju Joins the Fight
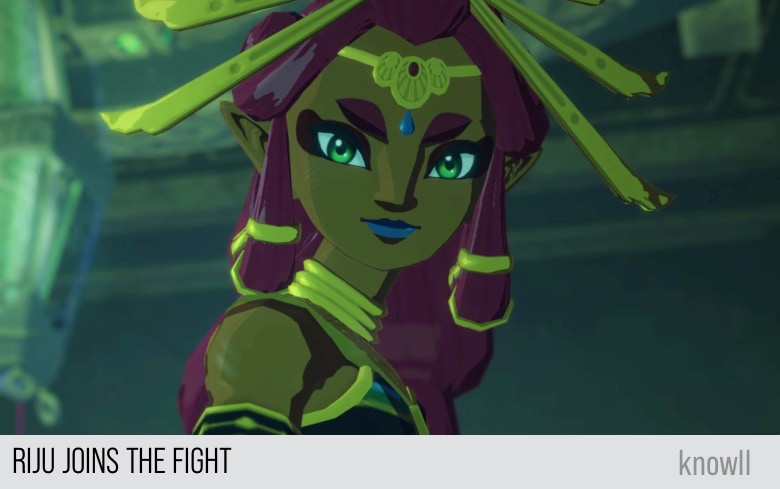
Urbosa struggles in fighting a monster in Vah Naboris.
Urbosa: I'm in trouble...
Out of nowhere, another hero helps Urbosa.
Urbosa: Where did you...
Riju: Lady Urbosa... For now, let us focus on winning this fight.
Teba Joins the Fight

Revali struggles in fighting a monster in Vah Medoh.
Revali: Just a scratch.
Out of nowhere, another hero helps Revali.
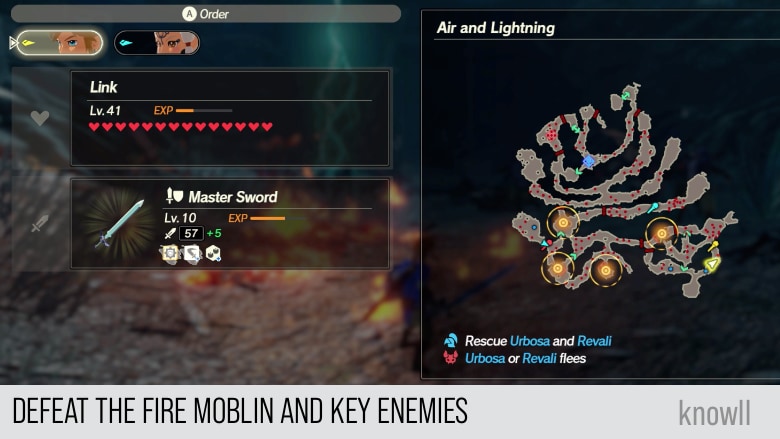
Objective: Defeat the Fire Moblin and Key Enemies
Zelda: Vah Medoh is still airborne... Let's head over and assist Vah Naboris first.
Gerudo Captain: Lady Urbosa is inside Vah Naboris, but the gates are locked. Please, help us!
You will notice that there are 4 target positions, but your heroes are locked in their own areas. That means you will have to use both of your heroes to complete this objective.
Command your other character to move to a target position, while you do combat with the other.
There are large groups of enemies in the field, use them as fuel to fill up your Special Attack gauge and then move on.
After capturing a post, command your current hero to move to another outpost. Then switch to your other hero that should have already reached an outpost by now.
Hylian Captain: We have a clear path forward. Come on!
Tip: The current quest environment has rain and plenty of water, elemental attacks that use Ice and Lightning will be optimal attacks.
Keep on doing this command-and-switch approach until you capture all the four outposts.
Zelda: The way to Vah Naboris is open. Onward! To Urbosa!
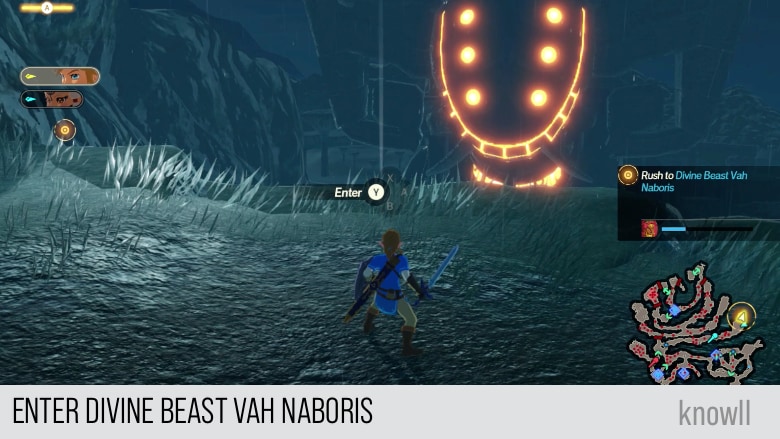
Objective: Head Toward Divine Beast Vah Naboris
Head toward the target position so you can start helping Urbosa in her fight against the monster in Vah Naboris.
Urbosa: Urgh... I could use some backup right about now.
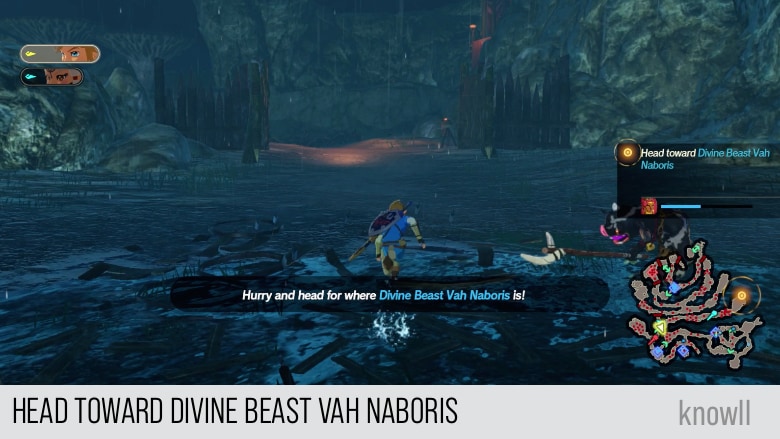
Once you reach the target position, a new strong enemy will appear.
Objective: Defeat the Electric Lynel
We have covered the moveset and attacks of a Lynel in Mipha, the Zora Princess. You can view our Enemies Guide for more tips on handling a Lynel.
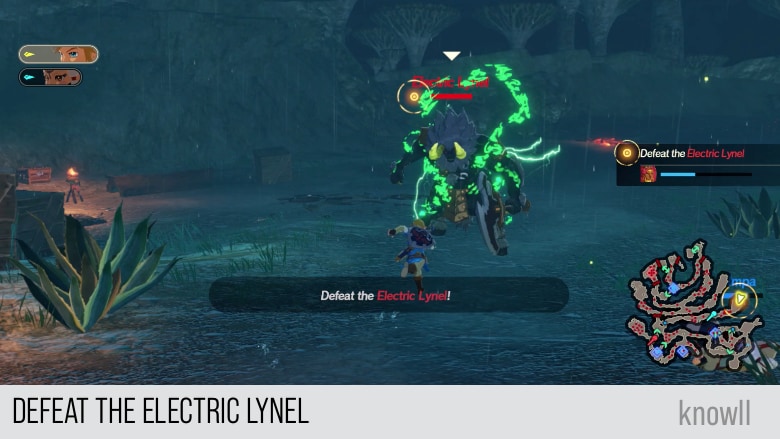
However, as this is an elemental enemy, it gains new attacks, which we cover below.
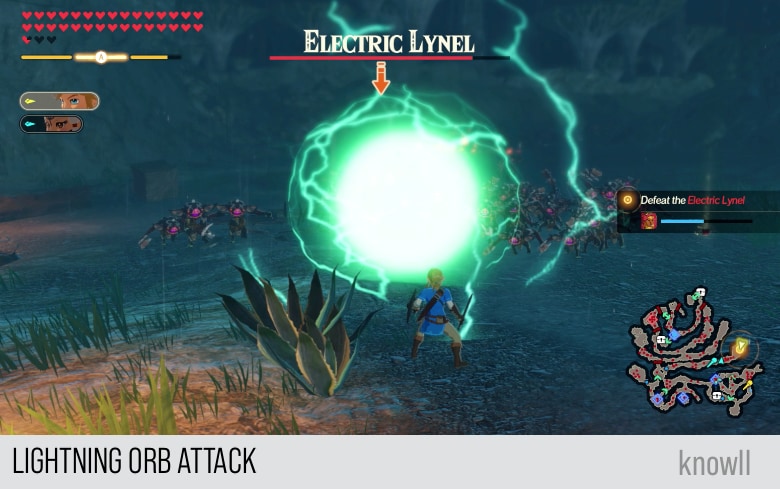
Lightning Orb Attack
The Electric Lynel uses a Lightning Orb instead of a Fire Orb. This will electrocute you if it hits.
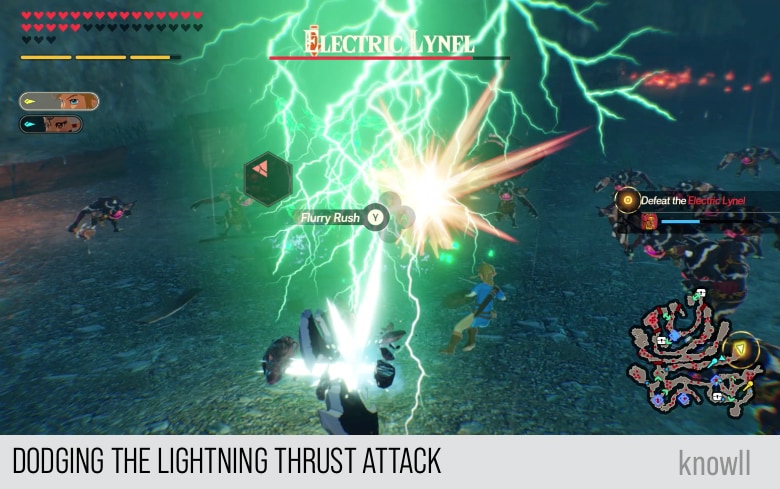
Lightning Thrust Attack
The Electric Lynel uses a three-move combo where the third part is a thrust that has an electric AOE as shown below.

You can dodge this and get a Flurry Rush by backflipping, which is the easiest dodge of all.
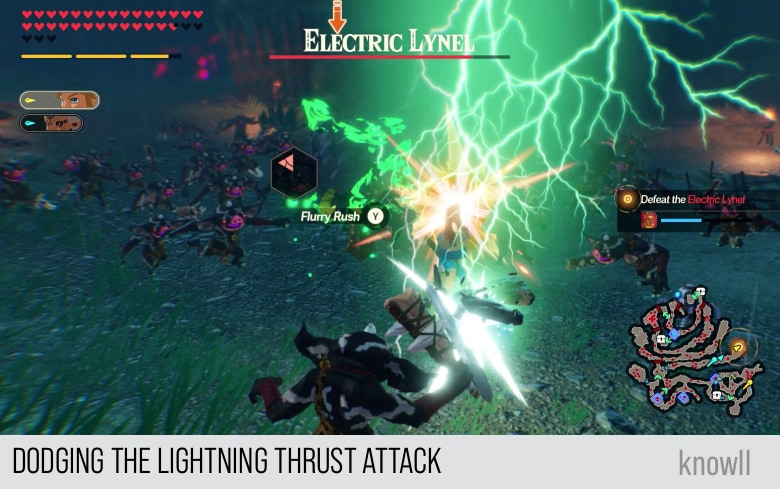
Alternatively, you can dodge by moving to the side and gain a Flurry Rush.
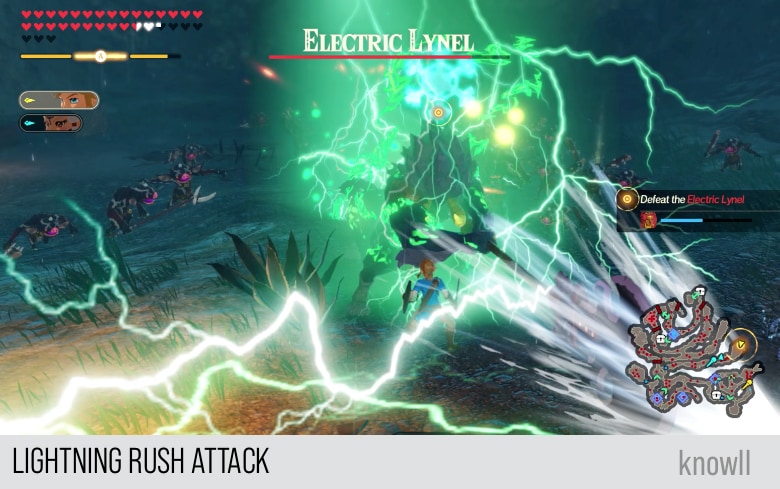
Lightning Rush Attack
All Lynels have a rush attack. The Electric Lynel gains a Lightning Rush where it emits an electric AOE in the last part of the attack. This will electrocute you once a spark hits you.
Lightning Smash Attack
This is an attack unique to the Electric Lynel. In the Lightning Smash, the Lynel jumps and then slams his spear in the ground, causing lightning circles to appear on the ground.
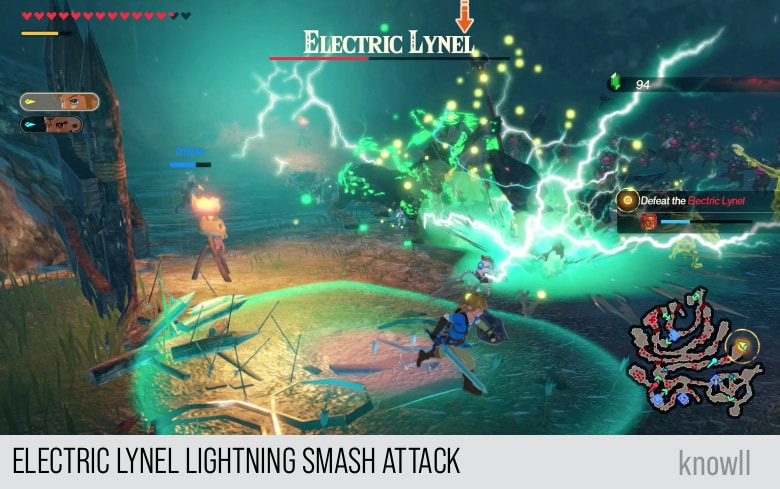
When the Lynel pulls his spear up, the circles will explode and electrocute anyone within them.
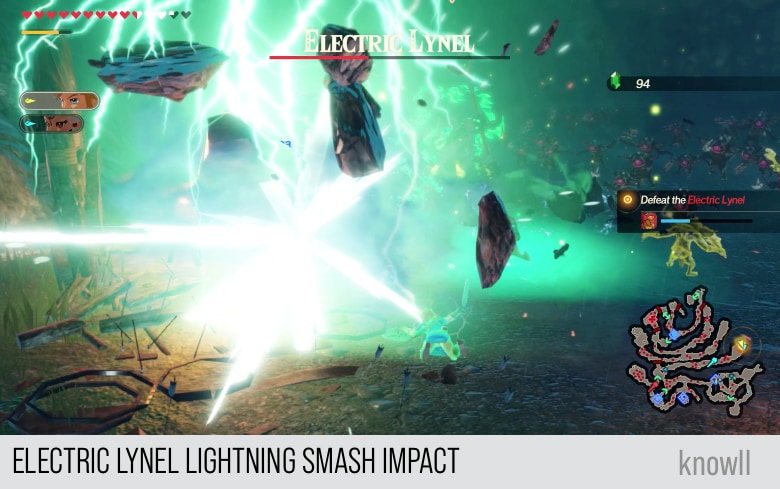
Note that the damage for getting hit by the initial slam is separate from the explosion of the circles later. You can get hit by both, making this one of the Electric Lynel's most powerful attacks.

After defeating the Lynel, you can proceed with the objective.
Zelda: Thanks to the little one, others can now board Vah Naboris.
You can only take one character to the Divine Beast, so choose your hero carefully.
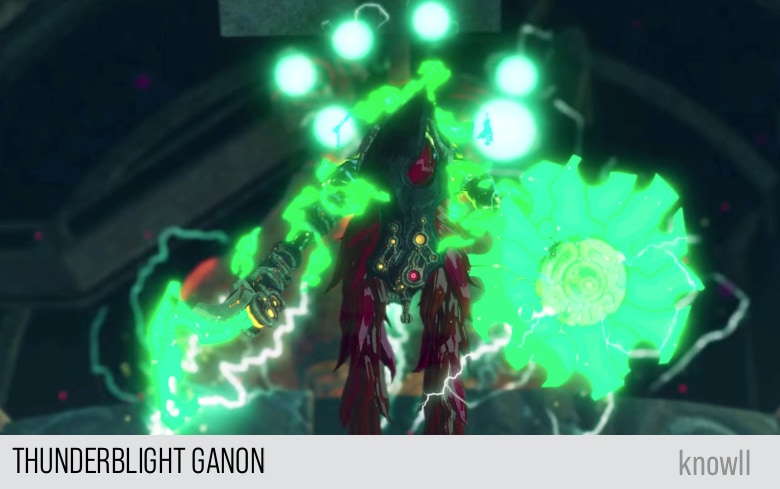
Avatar of the Calamity: Thunderblight Ganon
Urbosa and Riju find themselves pushed to their limits in their battle against Thunderblight Ganon aboard Vah Naboris. Fortunately, just as all seems lost, rescue finally arrives.
Urbosa: Vile creature! How is it moving like that?
Riju: I thought... I was strong enough to protect you.
Urbosa: Listen. You bought us much-needed time. Now look who's come to help.
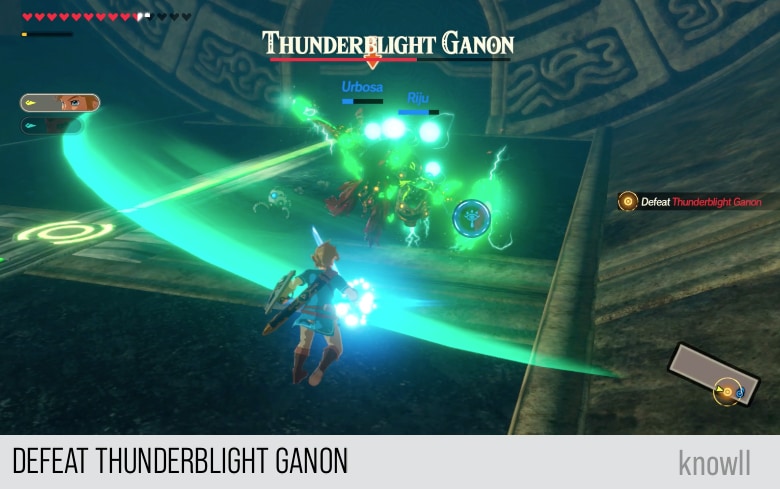
Objective: Defeat Thunderblight Ganon
Riju: You! Actually... We'll talk later. I need your help!
Urbosa: All right, now the real battle begins! Let us put that beast in its place!
Notice that Riju recognized Link. That means she already met Link's counterpart in her own world.
Fighting Thunderblight Ganon
Though Thunderblight Ganon is the smallest of the four Avatars of Calamity, he is the fastest of them all. In addition to having near-teleportation melee attacks, he is the only shield-user and can produce multiple clones of himself.
In the original BOTW, he is the most difficult enemy, almost at a Dark Souls level of challenge. In the Age of Calamity, they removed one of his game mechanics, where you have to electrocute him with a metallic item so he will be staggered.
Among the four Blights, Thunderblight Ganon has the most powerful AOE attack, the Lightning Beam, which can repel enemies in front of him.
Riju: Guh... That monster really is quite fast.
Urbosa: Unvarnished brute force will not serve us. Focus on the gaps in the enemy's defenses.
Lightning Blast Attack
In this attack, the monster moves up, apparently disappearing. You can only see the sparks he left behind.
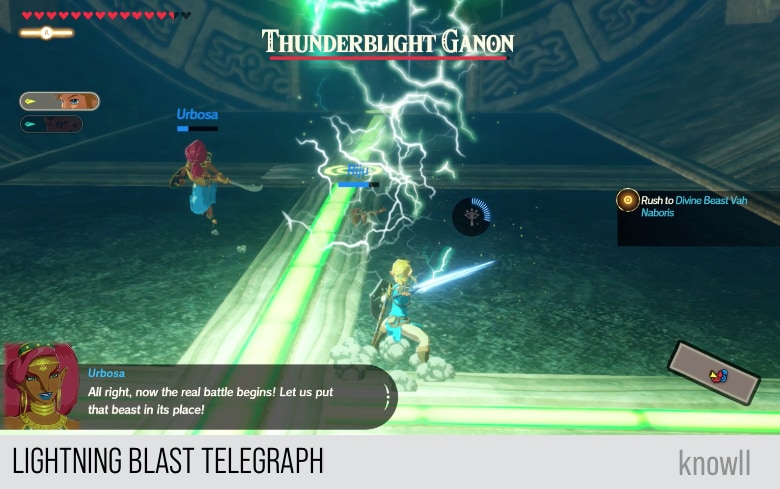
Then lightning circles will form up beneath you. This is already a sign of an impending attack.

Then the monster executes the attack and blasts downwards with extreme force. You do not take damage unless it hits you.
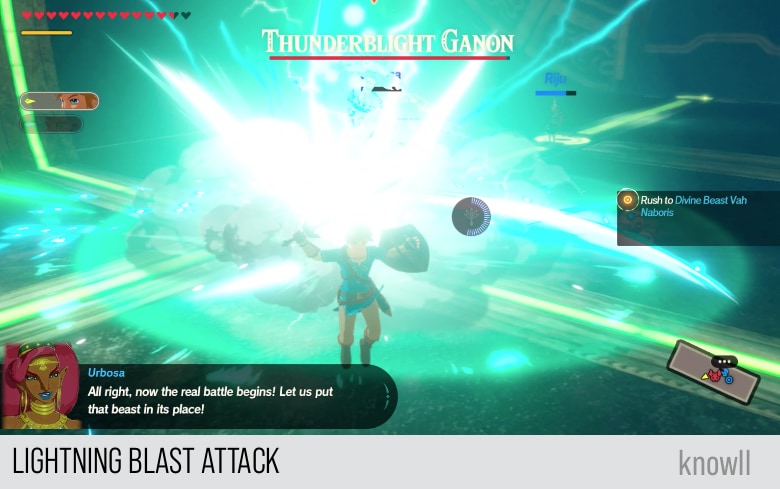
If you do not guard or dodge, it will definitely bring huge damage.
Though it's a little risky, you can punish this attack with a backflip dodge, gaining a Flurry Rush on the monster. It is safer to just get out of the circle and punish him after he lands the blast attack.
Lightning Storm Attack
In this attack, the monster summons multiple lightning circles, which he will immediately explode once his arm moves downward.
You do not take any damage until this arm movement happens, so you can easily get out of the circles.

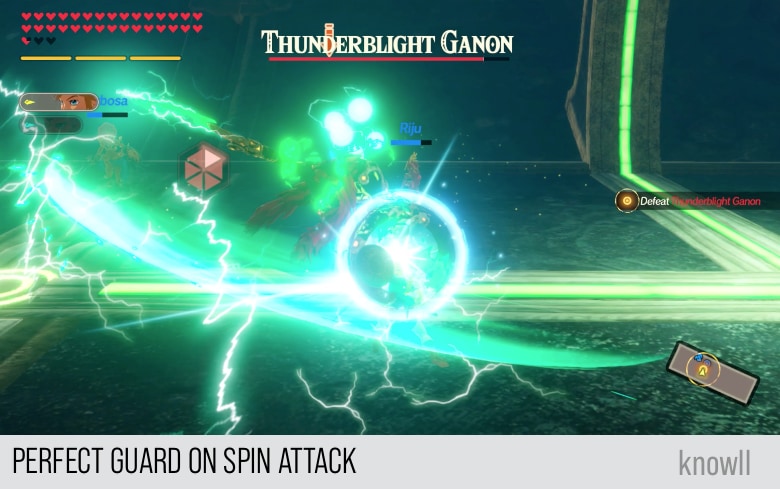
Spin Attack
Thunderblight Ganon has a good combination of ranged and melee attacks. The Spin Attack is one of his melee attacks.
In this attack, he performs three spins, each of which can take 1/4 heart. If you are blocking, the final spin will break your guard.
In this game, the faster the attack, the smaller the damage, especially if it has minimal telegraph or windup. It is the attacks that have a slow preparation that you have to be worried about.
If you would like to show the monster who is the real boss, you can do a perfect guard on his third spin. This will damage him a little and put him in a vulnerable state.
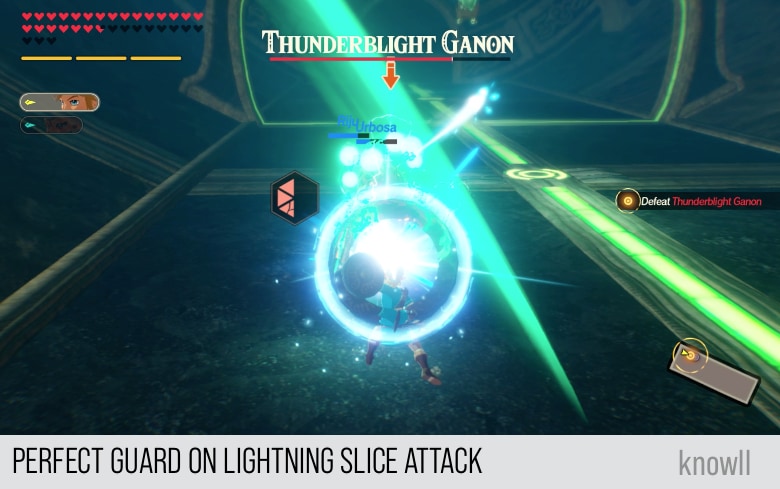
Lightning Slice Attack
The Lightning Slice is very similar to the Spin attack, but instead of spinning, the monster makes multiple small slicing attacks, and then one large slice attack. You will most likely get hit only by the last slice.
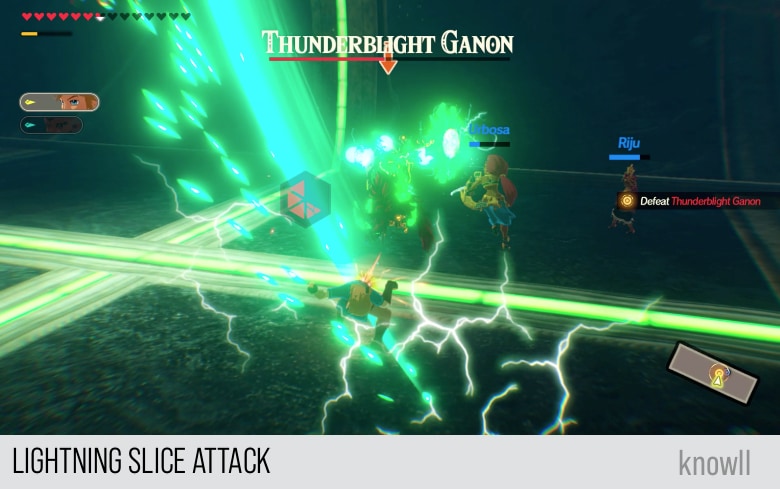
As this attack has a regular rhythm, you can anticipate the last large slice and dodge it, thereby gaining a Flurry Rush on the monster.
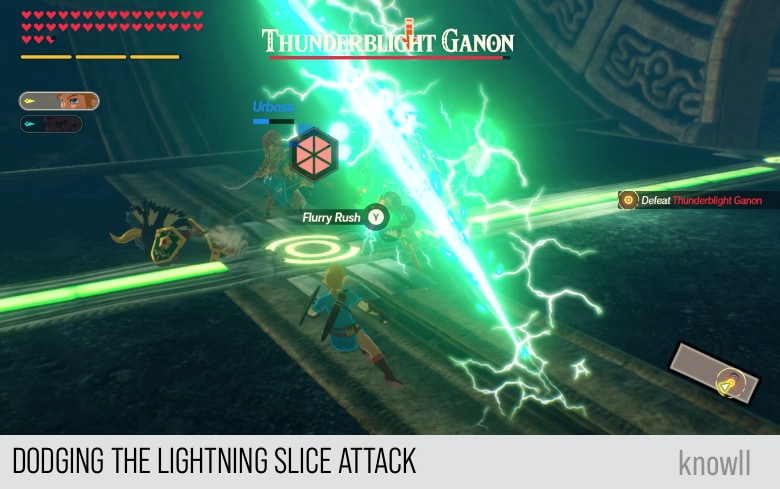
Alternatively, wait for the last big slice and do a perfect guard on the monster.
Replication Attack
Thunderblight Ganon typically performs the Replication Attack after receiving significant damage. But sometimes he does not do it all.
You will know this attack is about to happen when he forms a ball of energy around him, as shown below.
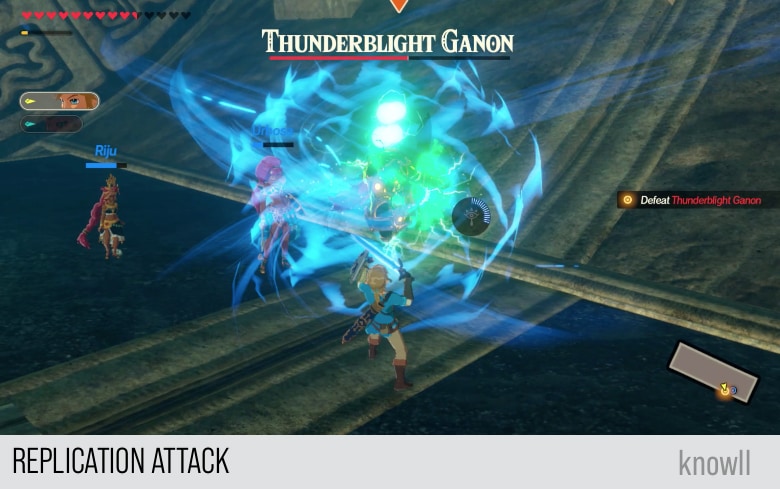
This attack will not cause you damage but will produce two clones, which you can easily identify through their colors, as shown below.
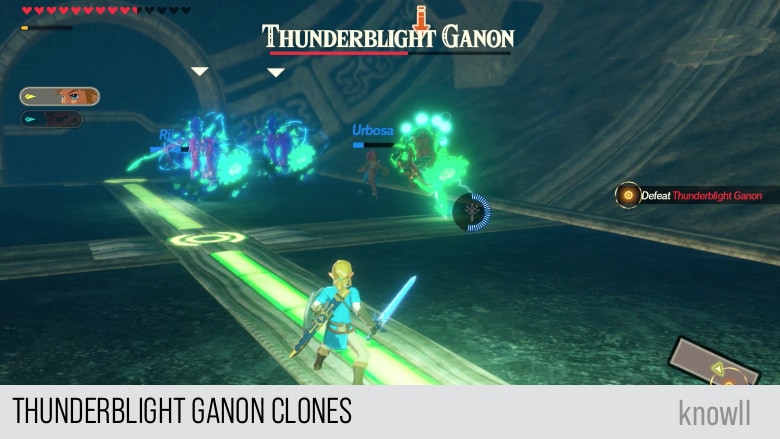
You can dual Stasis these enemies as the space where you fight them is relatively narrow.
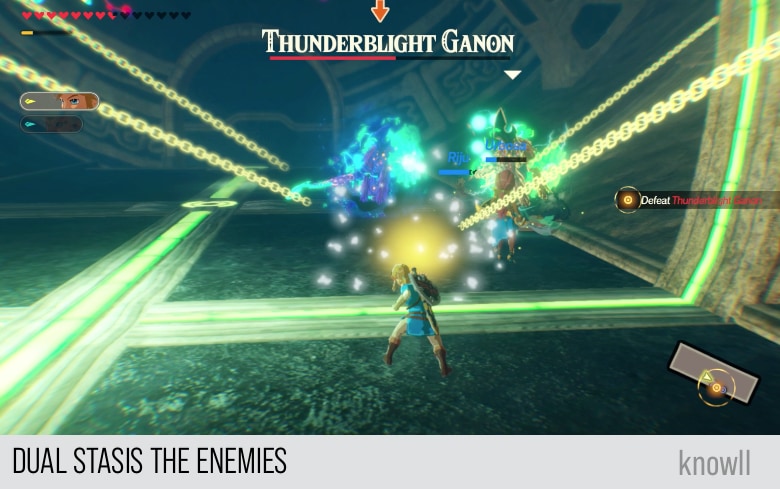
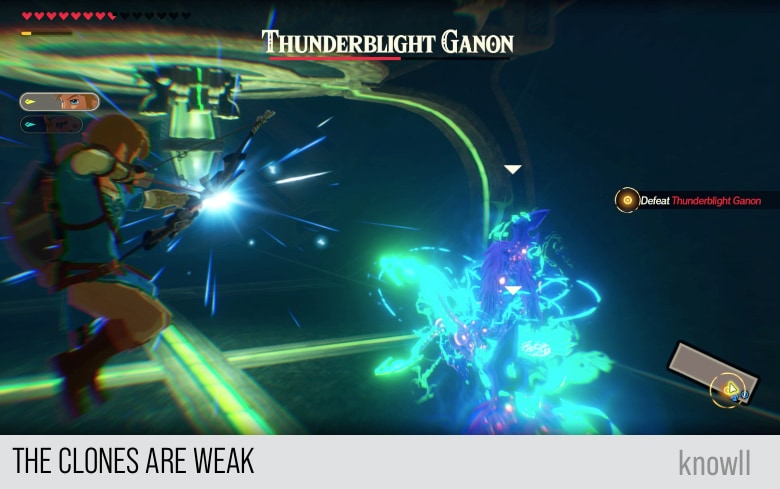
These clones are relatively weak though as their health is not linked to the original monster. One release of your Special Attack will kill them.
They only have one WPG, once it runs out, they can be killed.
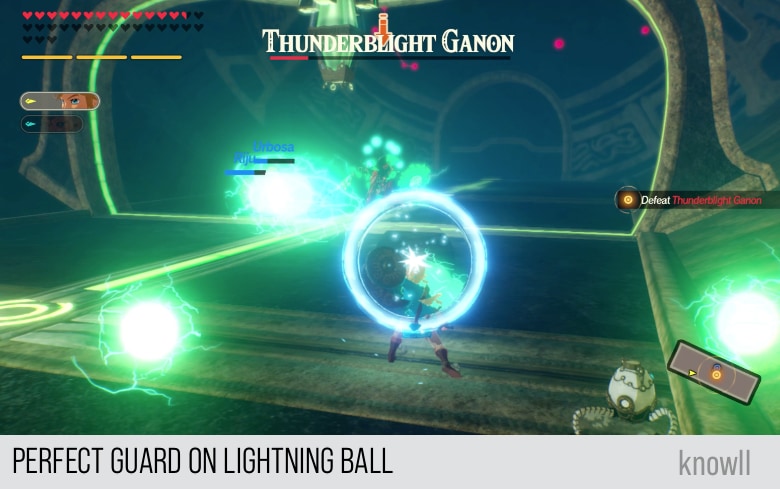
Lightning Ball Attack
The Lightning Ball attack is one of the range attacks the monster likes to spam on you. You can know it is coming when he does this pose as shown below.
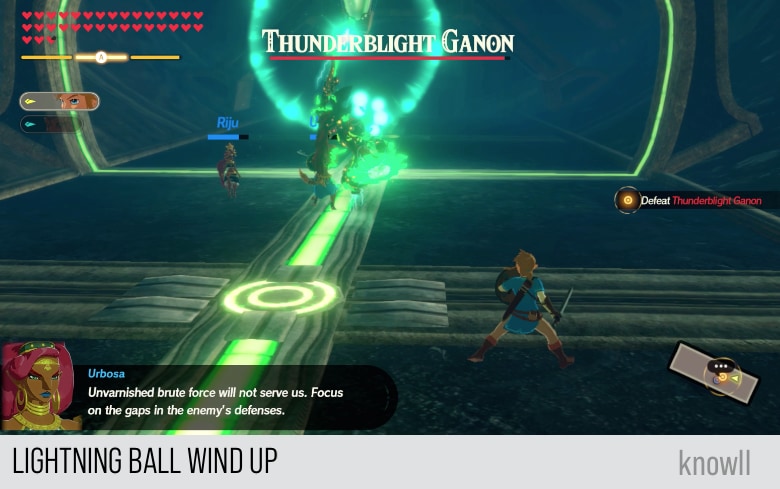
Once he moves down his arm, he will release three Lightning Balls, each of which can take 1/2 heart from your life bar. Note that all of them can hit. If the monster has clones, all of their Lightning Balls can do damage, if you get hit by them.
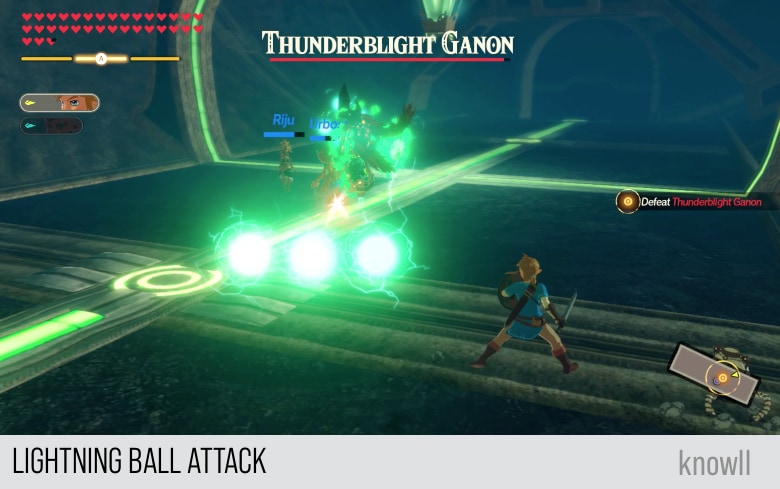
These Lightning Balls are very easy to avoid though. Just dodge to your side. Or if you are feeling lucky, do a Perfect Guard on one of the Lightning Balls. The ball will get deflected and move in the opposite direction.
Lightning Armada Attack
The Lightning Armada is one of the most interesting attacks of Thunderblight Ganon, next to the Lightning Beam. It has a very visible telegraph which you can counter using Magnesis.
In this attack, the monster collects weapons of various kinds - swords, shields, etc.
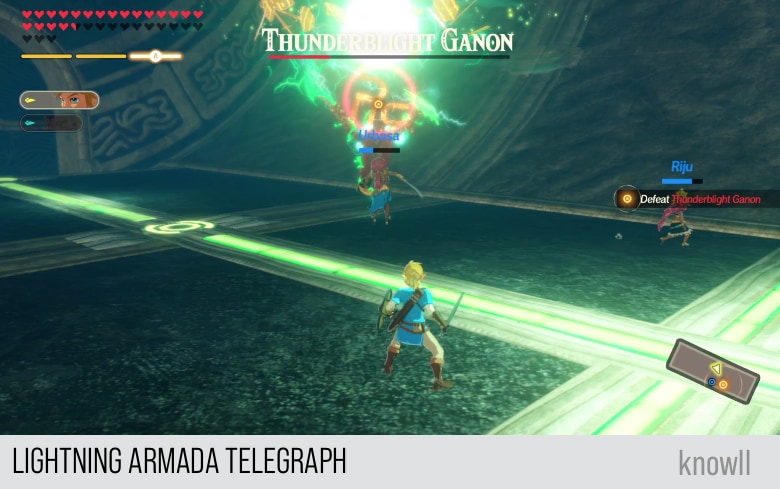
After collecting these weapons, he will form a large lightning orb and then throw it at you. This is a slow-moving giant orb.
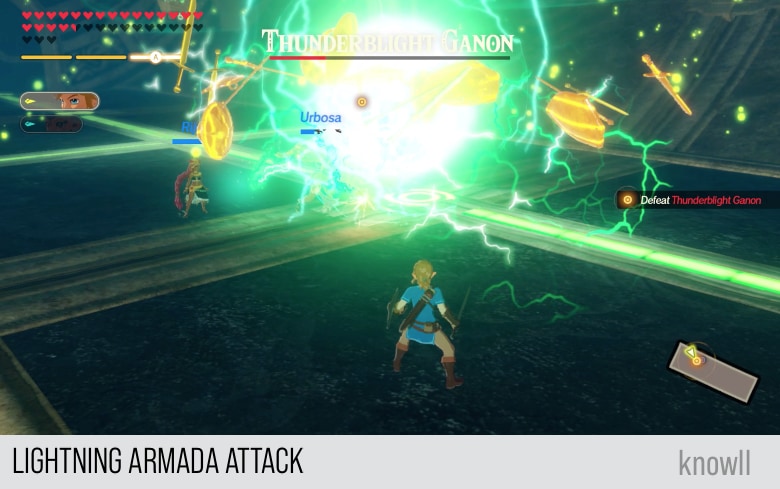
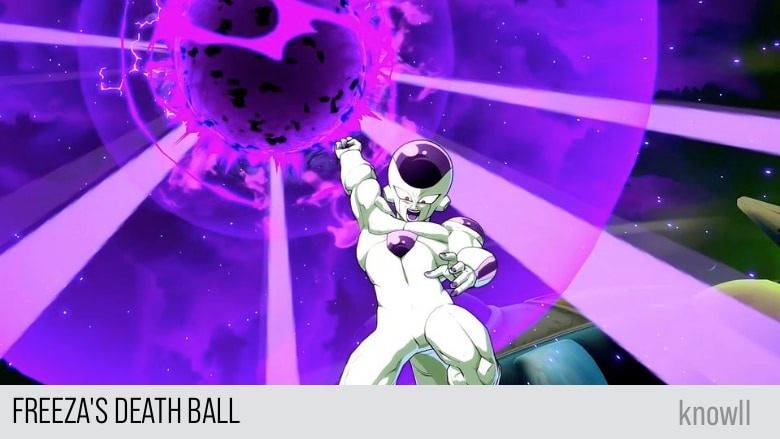
It is very similar to Freeza's Death Ball.
Once the attack hits, it will fill the screen with lightning and sparks of destruction.
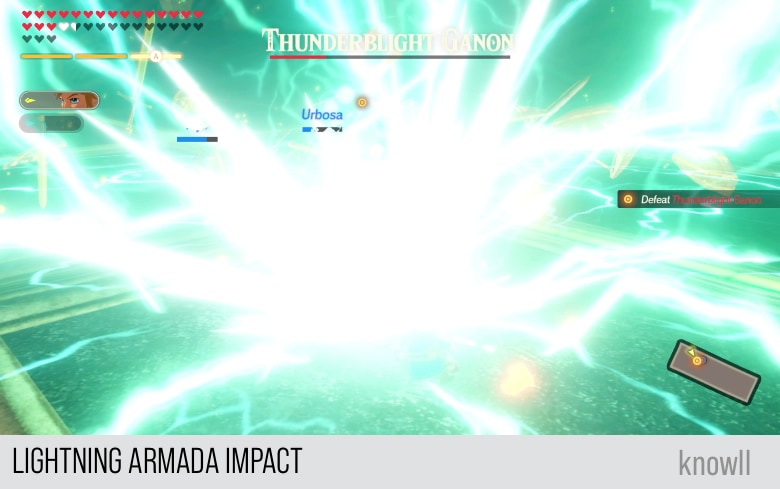
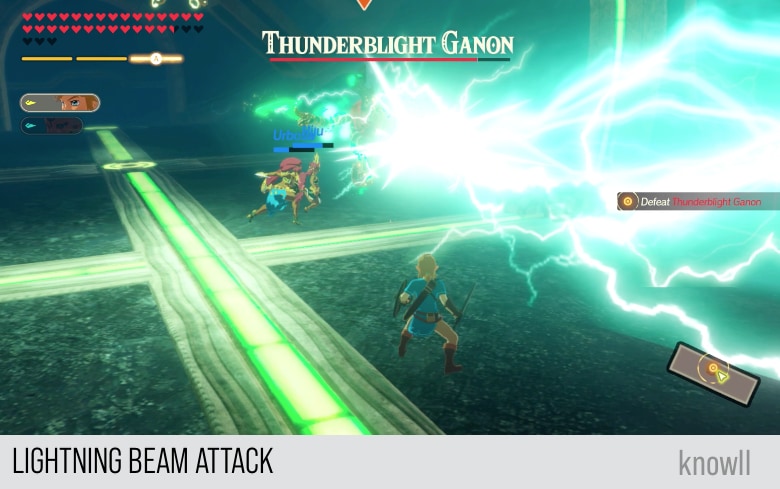
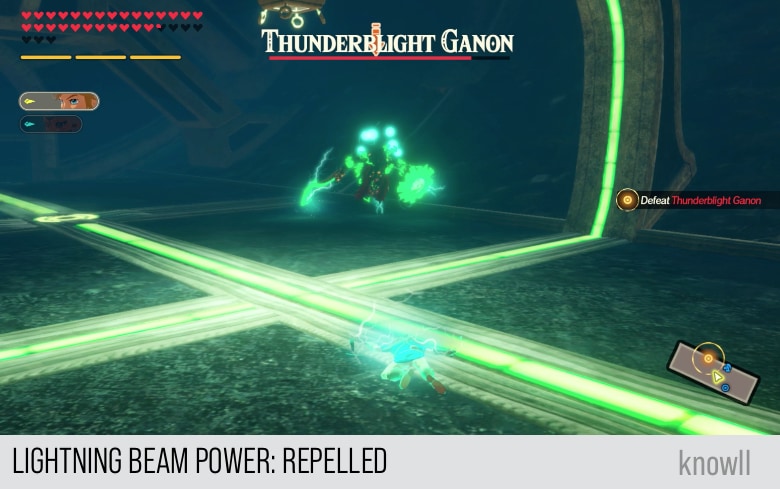
Lightning Beam Attack
The Lightning Beam takes the top attack for Thunderblight Ganon though. Similar to other powerful attacks, it has a telegraph which you can counter with Remote Bombs.
In the wind up for this attack, he just stands still, as though collecting his energy. Typically he also shields up.
Then he opens up his arms and releases one of the flashiest and strongest AOE attacks in the whole game. It has one weakness though, it can only hit in one direction. So you can just be standing next to it and take no damage.
You can see none of the heroes below got hit by this powerful attack.
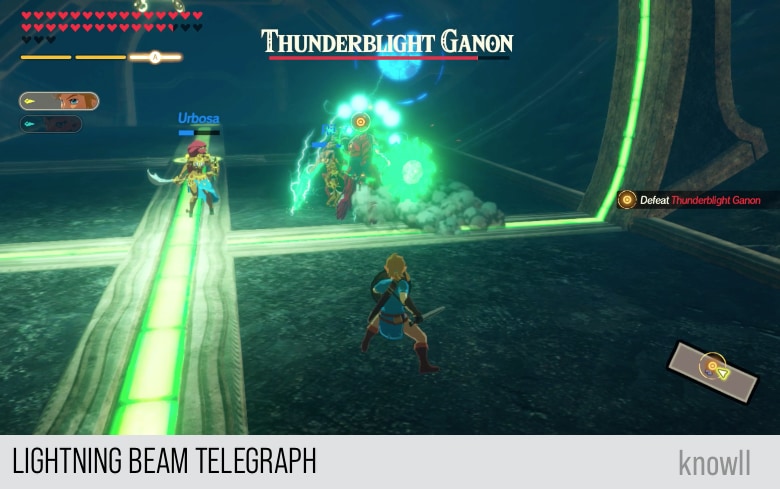
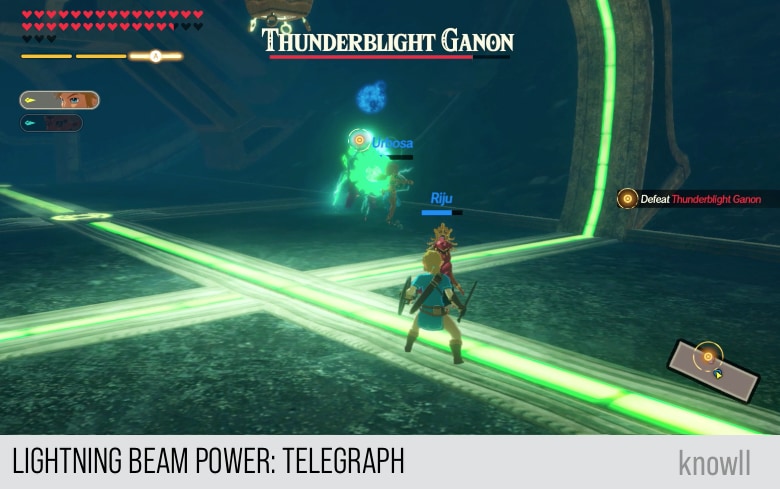
How Powerful is the Lightning Beam Attack
So the question is if it succeeds in hitting the targets, how powerful is the impact? In this demo below, Link and Riju are standing near each other, far from Thunderblight Ganon. Urbosa is in front of the monster, doing melee attacks.
Meanwhile, Thunderblight Ganon is charging his Lightning Beam attack, while his shield is up.
Finally, he releases the attack, blasting Riju out of the screen, with Urbosa flying as well.
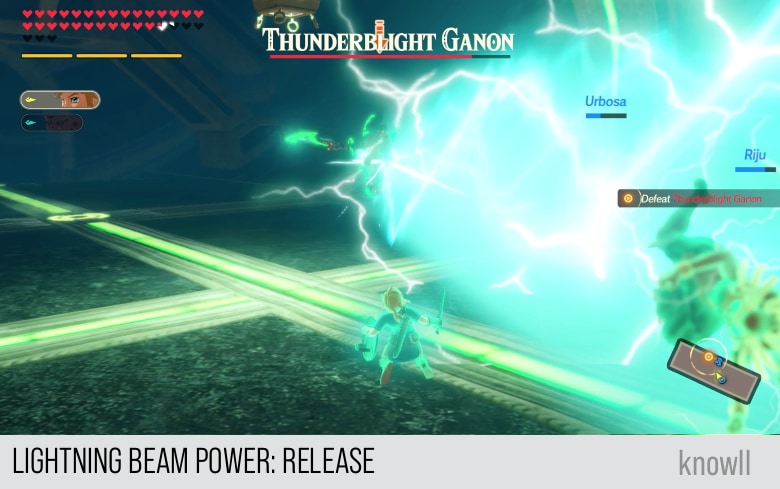
Link got severely electrocuted, while Urbosa is still flying after getting pushed back by the attack.
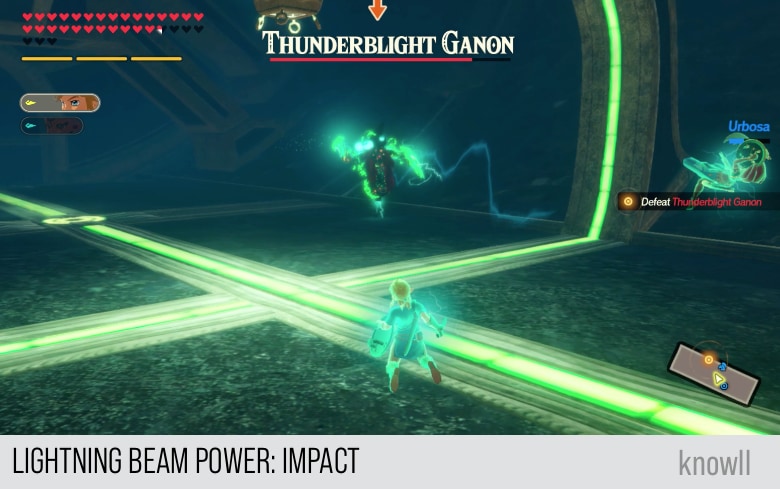
Finally, the attack is over, and two heroes disappeared after getting repelled by the attack. Link still has not gotten up after all this time.
Using all the tips shared above, go ahead and defeat Thunderblight Ganon.
Urbosa: I am not accustomed to being in need of rescue. Regardless... thank you.
Urbosa: So now we have to board Vah Medoh in the skies, hm? I know just the way...
Using her lightning powers, Urbosa opens an updraft in Mount Rhoam.
Urbosa: We can use the... updraft. That should carry us to the Divine... Ugh...
Riju: Lady Urbosa is exhausted from battle, so I will accompany you. Let's hurry to Mount Rhoam!
You can now play as Riju!
Riju: I heard Rito warriors were nearby... Perhaps they can enter the outpost and open the gates.
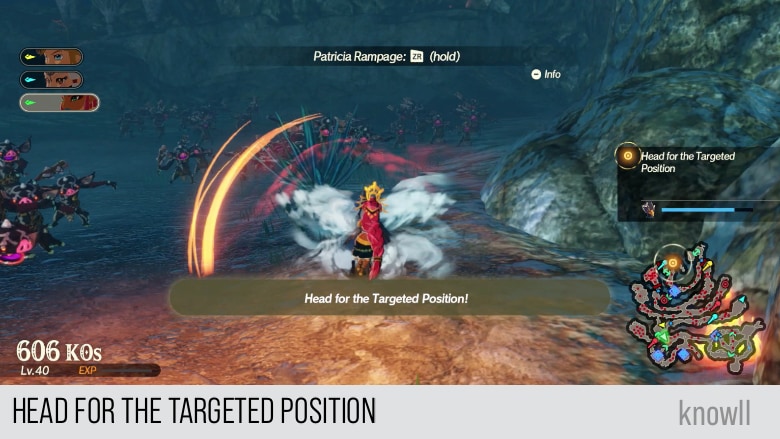
Objective: Head for the Targeted Position
Now that Riju got unlocked, you can use this chance to become familiar with her moveset and attacks.
Rito Captain: Bah! It's a Hinox! Everyone, RETREAT!
Riju: We can't proceed because of the monster assault. That means we'll need to clear them out!
With the appearance of new enemies, you need to clear them out first. There are three of them, all large and powerful: Ice Hinox, Fire Hinox, and a White-Maned Lynel.
Defeat the Ice Hinox and Key Enemies
This is the first time that elemental Hinoxes are appearing in the game.
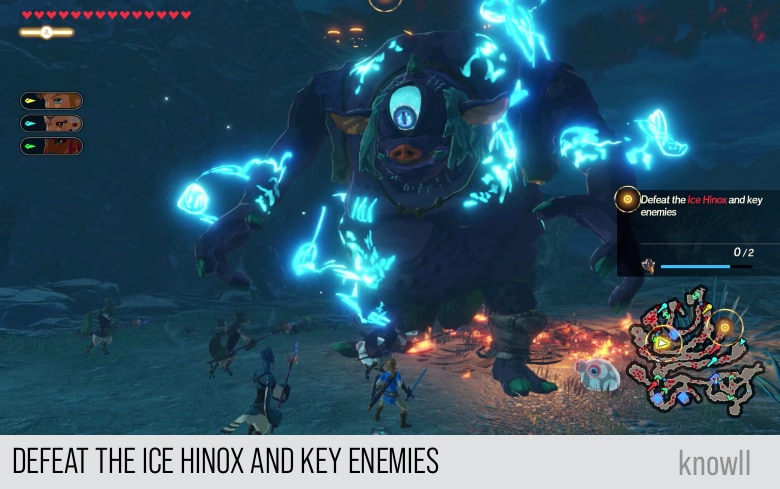
Fighting the Ice Hinox
We have covered the moveset and attacks of a Blue Hinox in the entry When Courage Fails. You can view our Enemies Guide to get more tips on handling Hinoxes.
As this is an Ice Hinox, it gains new elemental attacks.
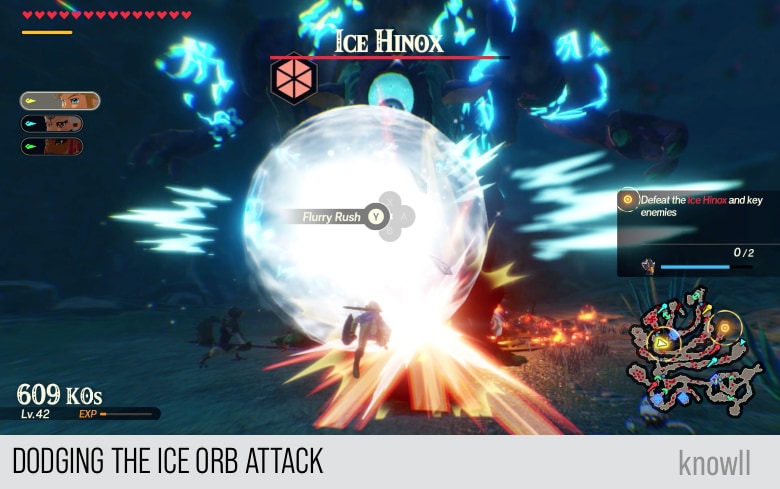
Ice Orb Attack
In this attack, the Hinox gathers up his power and shows a telegraph, which you can counter using a Remote Bomb.
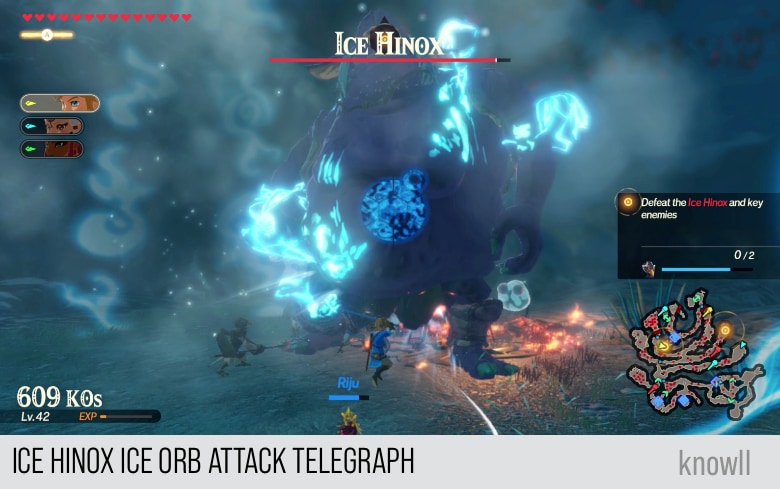
If you do not counter, the Hinox will continue his attack and produce a giant Ice Orb.
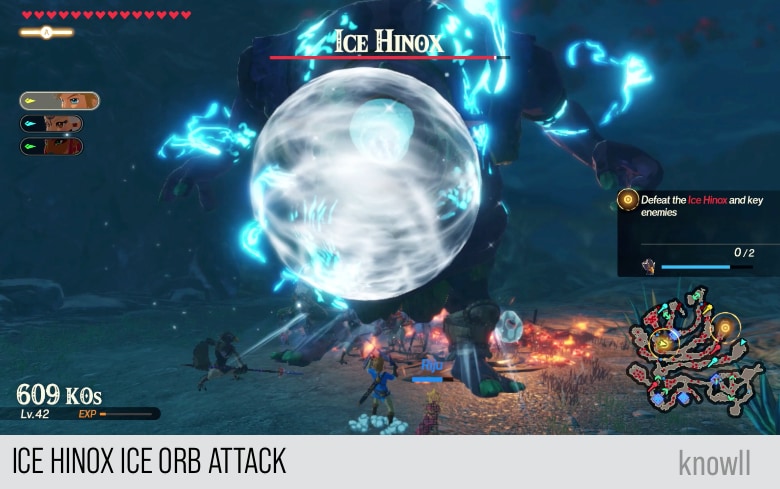
The Ice Orb will freeze all enemies in front of the Hinox and produce considerable damage.
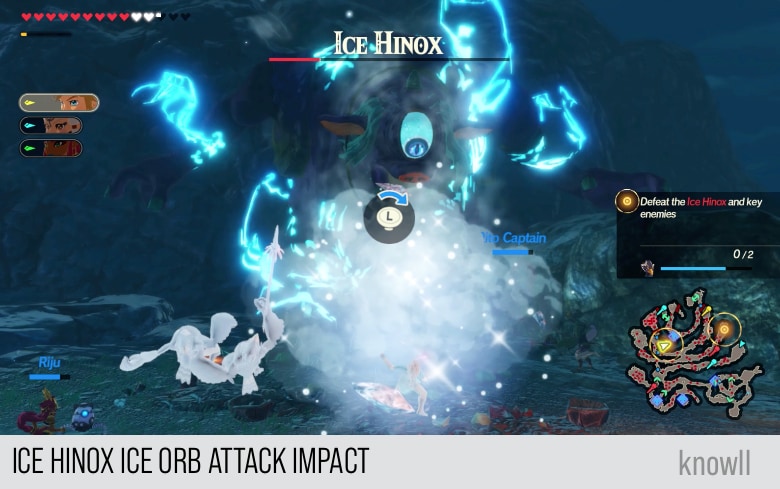
You can punish this attack by simply doing a backflip dodge so you can gain a Flurry Rush.
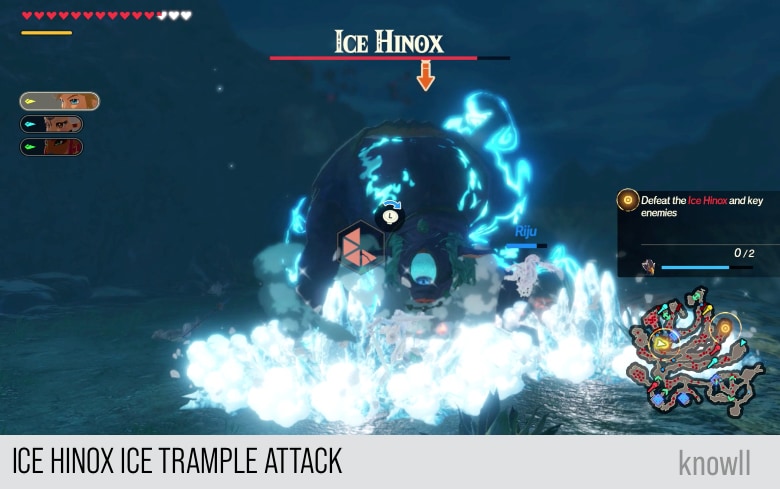
Ice Trample
All Hinoxes do the Trample Attack, where they hammer both of their hands on the ground. In the Ice Trample, the Hinox produces a freezing effect on its last attack.
After defeating the Hinox, you will see a request for help from Revali, though it does not look like one.
Revali: You've lasted this long against me? Hm, I'm mildly impressed.
Fighting the Fire Hinox
The Fire Hinox has a very similar moveset to the Ice Hinox, except that it burns its enemies, instead of freezing them.
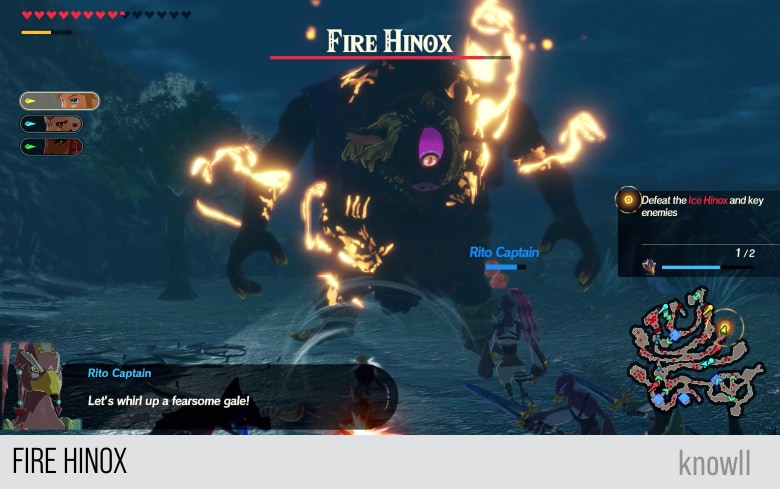
The Fire Hinox has one attack though that he shares with the Fire Moblin.
Fire Beam Attack
A normal Hinox uses a large log that he swings on you like a sword.
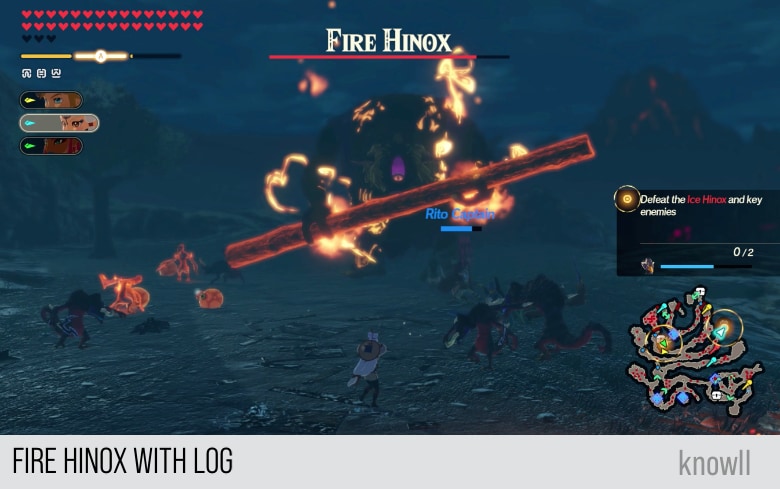
The Fire Hinox gains the Fire Beam attack, which sends a long-distance beam that will burn everything that it hits, even other monsters.
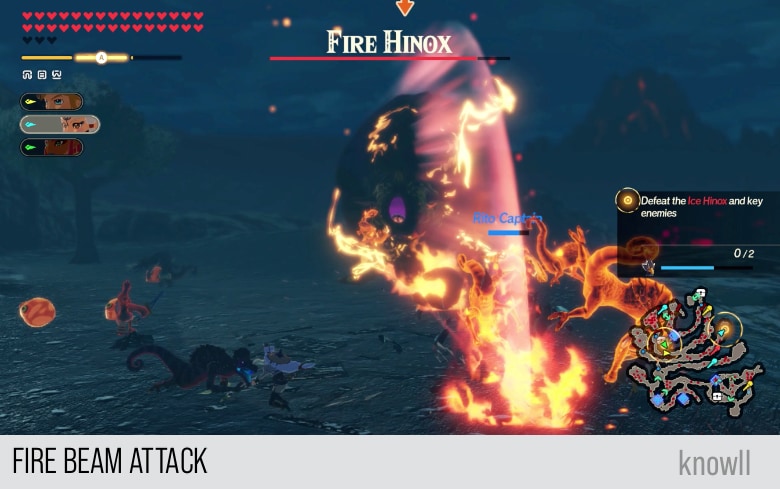
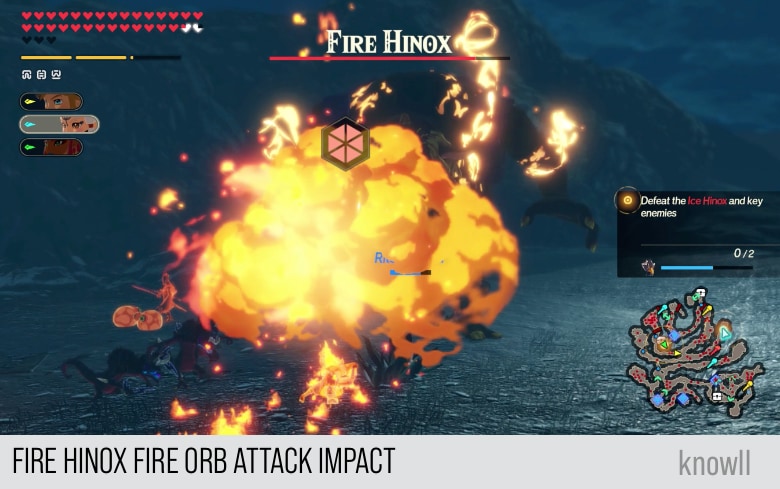
Fire Orb Attack
Similar to the Ice Hinox, the Fire Hinox has a Fire Orb, which you can counter using a Remote Bomb.
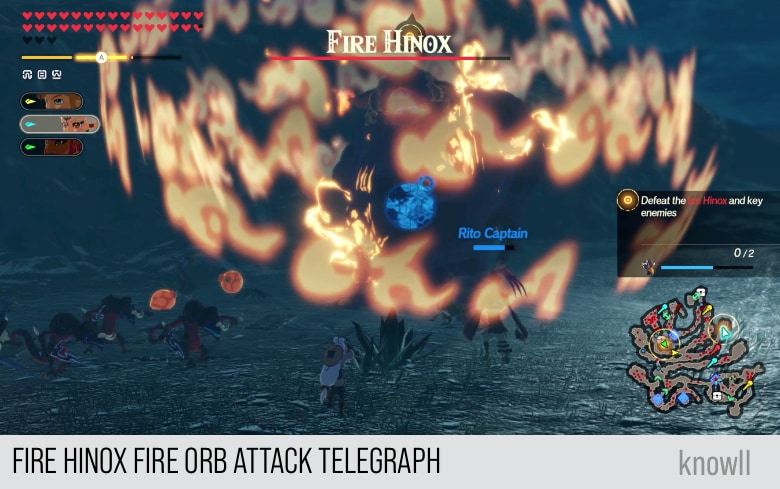
The Fire Orb is of the bouncing type though, it keeps on bouncing until it hits a target.
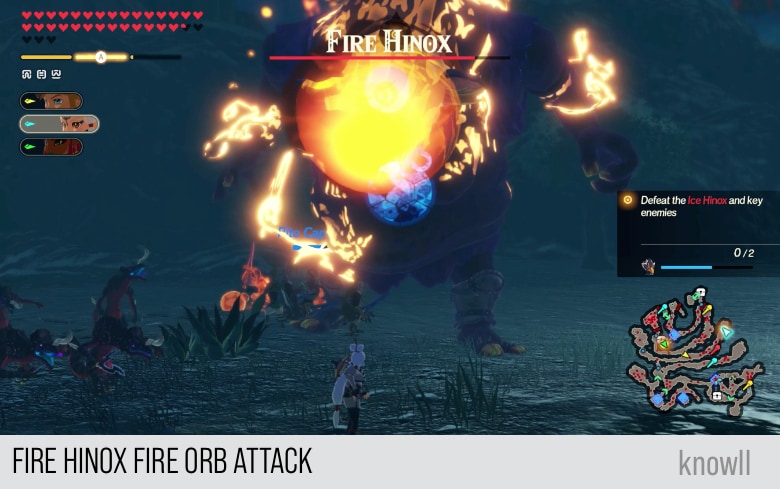
It will produce a huge burning effect once it hits you.
Using our tips above, go ahead and defeat the Fire Hinox.
Rito Captain: You got rid of the Hinox for us? Thank you! Wait here, and we'll open the outpost gates.
The Rito Captain has entered the Outpost and opened the Gates!
Urbosa: Wonderful, they stayed true to their word. Let's go!
Rito Captain: Hey! You should know there was a Lynel near the mountain's summit. Be careful out there!
Zelda: If we tried riding the updrafts, we'd get shot down. We'll have to handle the Lynel first.
Objective: Defeat the White-Maned Lynel
We have covered the moveset and attacks of the White-Maned Lynel in the entry Calamity Strikes. You can view our Enemies Guide for more tips on handling Lynels.
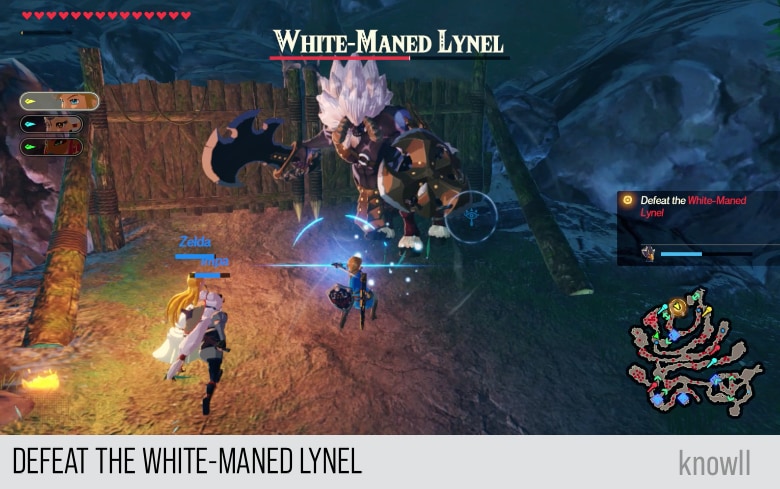
While fighting the Lynel, you will see another plea for help from Revali.
Revali: I see how this could happen to the others... but to ME? Gah!
Once you have defeated the Lynel, you can proceed with onboarding Vah Medoh. Note that you can only bring one hero to the Divine Beast, so choose carefully.
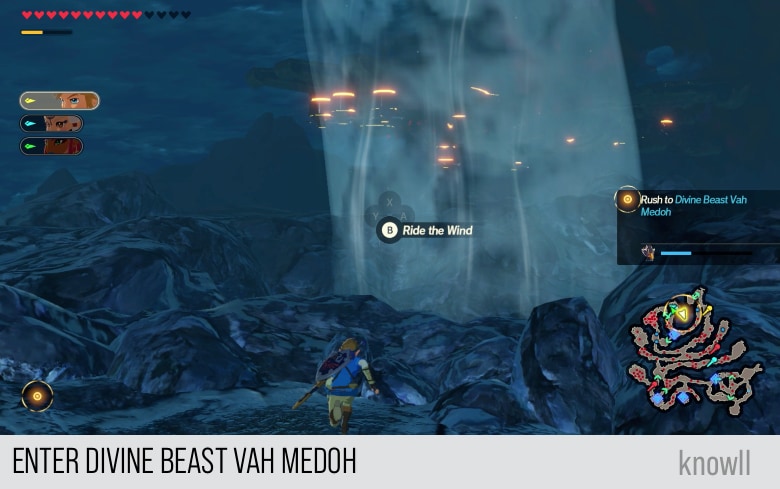
Riju: Now, it's time to ride the updrafts. Those who remain, press forward from the ground!
Enter Divine Beast Vah Medoh vai the giant updraft!
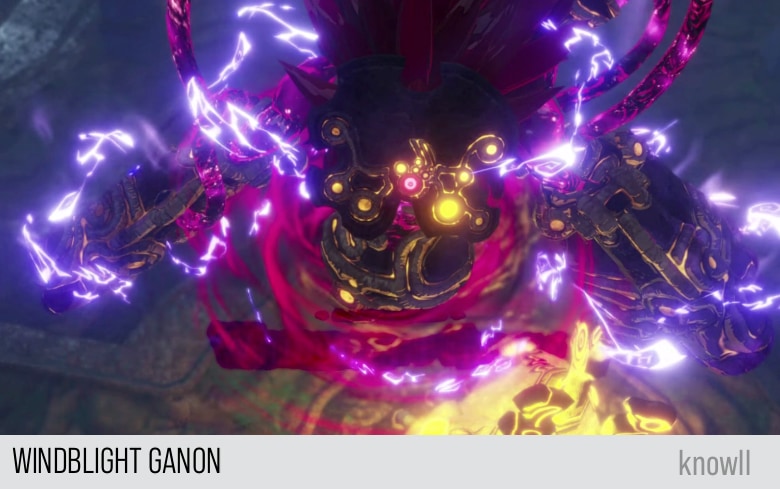
Avatar of the Calamity: Windblight Ganon
Revali and Teba fight bravely against Windblight Ganon aboard Vah Medoh, but it is clear they are in a losing battle. Things seem bad for the winged heroes, but rescue arrives just in the nick of time.
Teba: All yours, Master Revali!
Revali: Some payback is in order!
Teba: What? That thing's still standing?
Revali: Yes. And yet... I can't help but feel that the wind may finally be at our backs.
Revali: Took you long enough to get here, eh? I know I'm worth the trouble, but you really shouldn't have.
Teba: I think what the Champion means to say is... thank you. Now let's get rid of this thing!
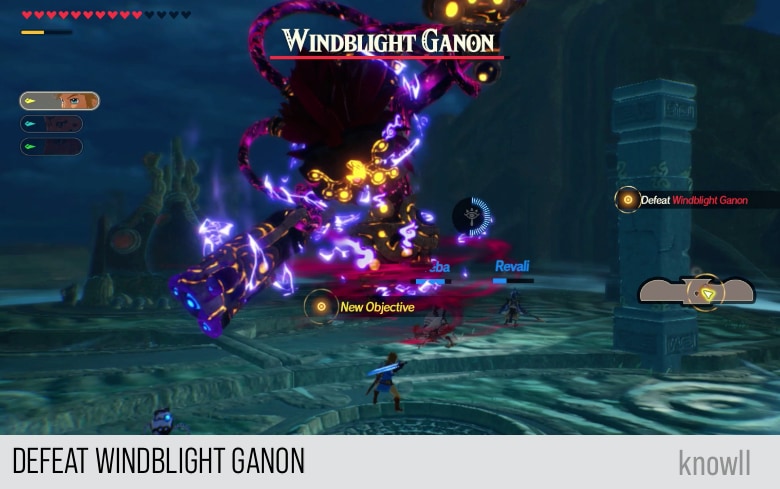
Objective: Defeat Windblight Ganon
Almost all attacks of Windblight Ganon are ranged attacks. This fits his theme as well as his main enemies Revalie and Teba, as both are ranged fighters also.
Fighting Windblight Ganon
Before we go through the attack patterns of Windblight Ganon, let's discuss his one major weakness. This monster is very weak to arrow shots, or any attack that can hit its eyes.
If you remember in BOTW, he has the same weakness as well. The main trick of his boss fight in BOTW is to shoot his eyes and then attack him while he is down.
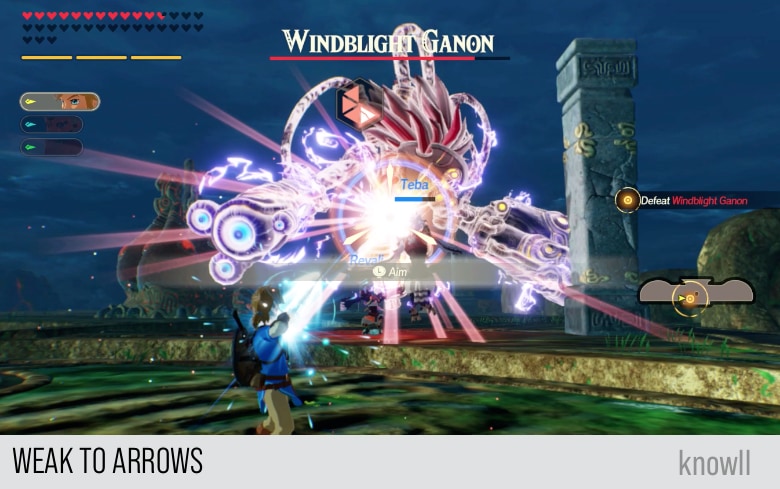
In the Age of Calamity, you can stagger him and even interrupt his attack by just shooting arrows near his eyes. This will give you more chances in reducing his WPG after placing him in Stasis.
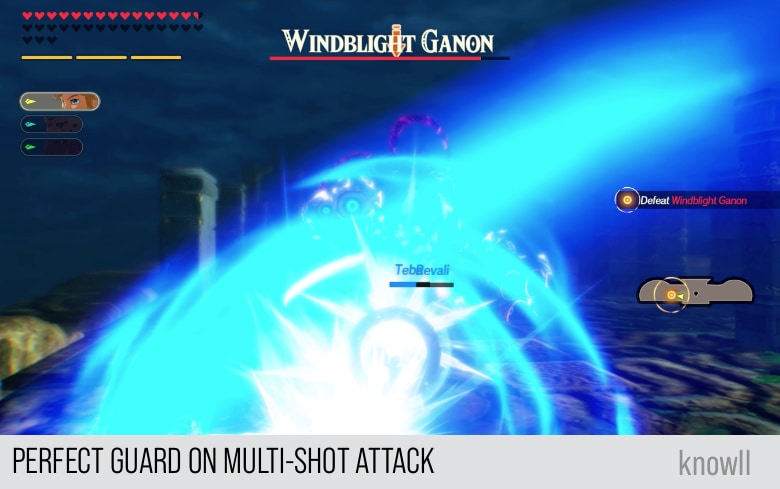
Multi-Shot Attack
This monster is a spammer of ranged attacks, and Multi-Shot attack is the one he likes to do the most.
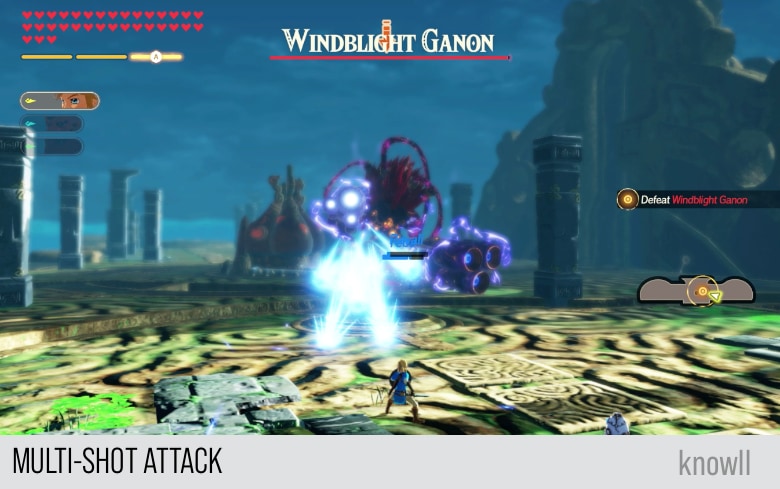
These attacks are very easy to dodge, but if you are feeling confident, you can do a perfect guard on them as well.
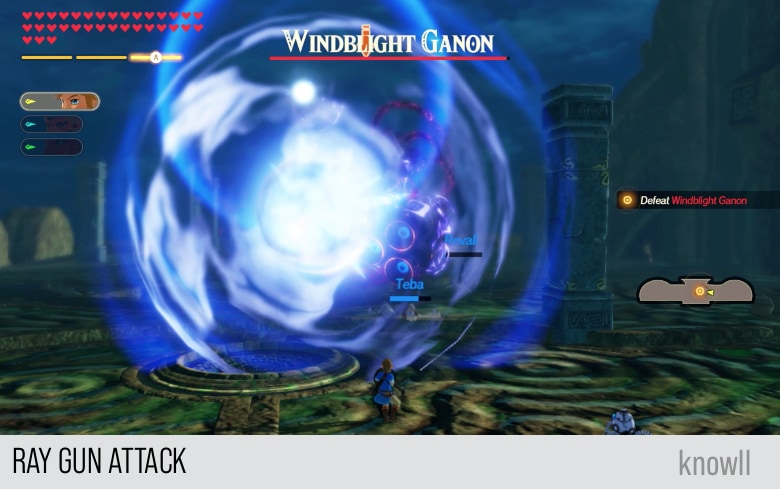
Ray Gun Attack
The Ray Gun is a more powerful attack as it has a windup and a visible telegraph. He pauses and points a gun on you.
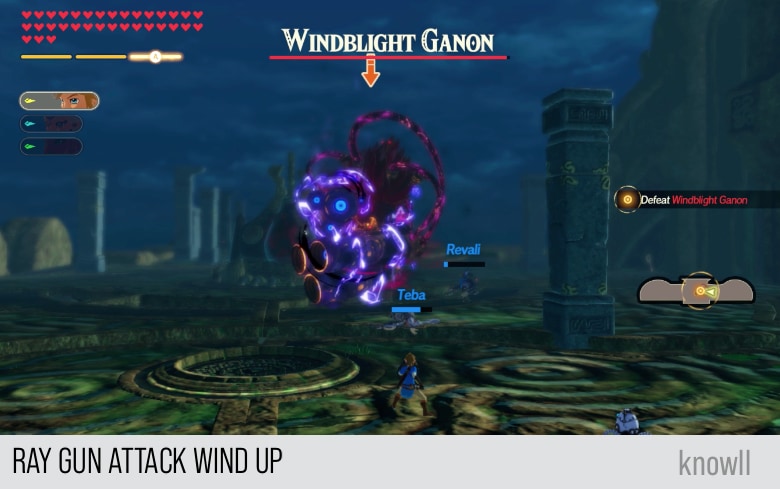
Then the monster releases one huge energy shot, which you can also easily dodge or even block.
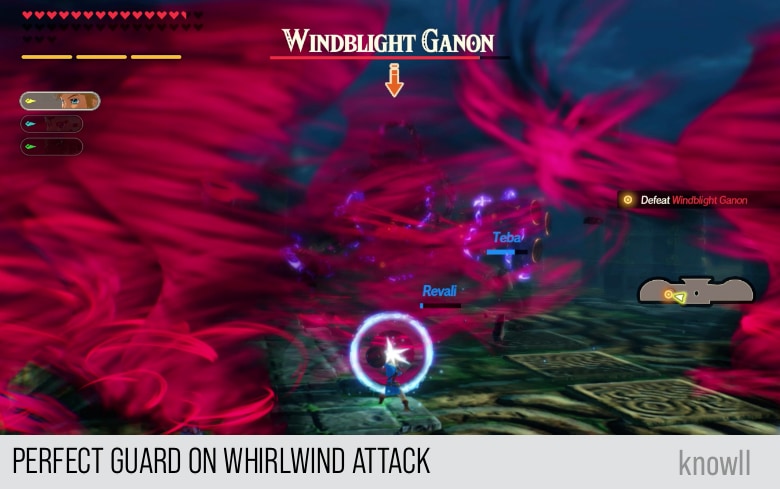
Whirlwind Attack
In this attack, the monster pulls back and positions his left hand as though it is drawing the power of the winds.
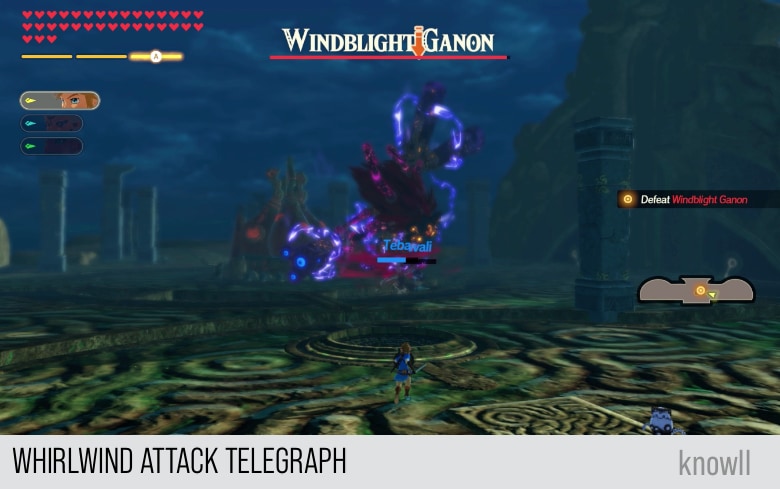
Then he releases a number of tornadoes, that keeps on getting larger the nearer they get to you.

You can punish this attack by dodging to your side, hence gaining a Flurry Rush on the monster.
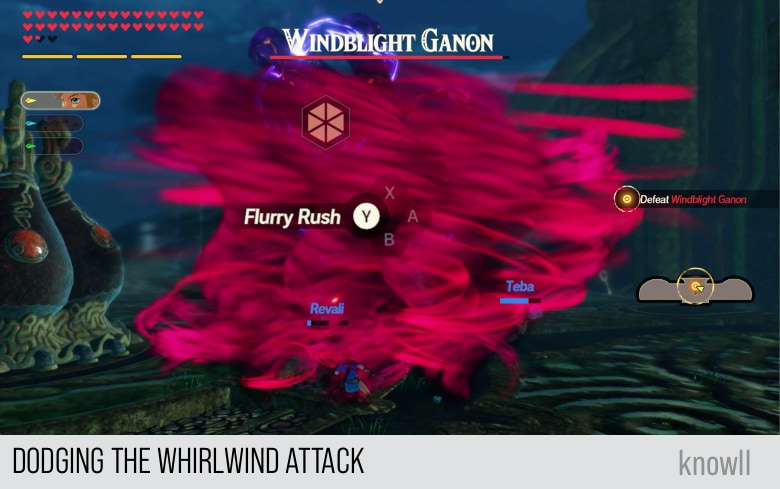
Alternatively, if you feel confident, you can do a perfect guard on them and it will move in the opposite direction.
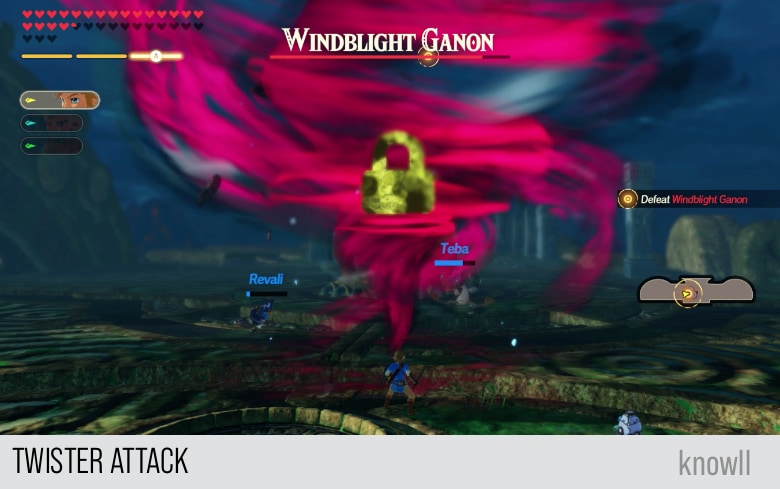
Twister Attack
The Twister Attack is the strong version of the Whirlwind Attack. It has a slower wind up, plus a telegraph that you can counter with Stasis.
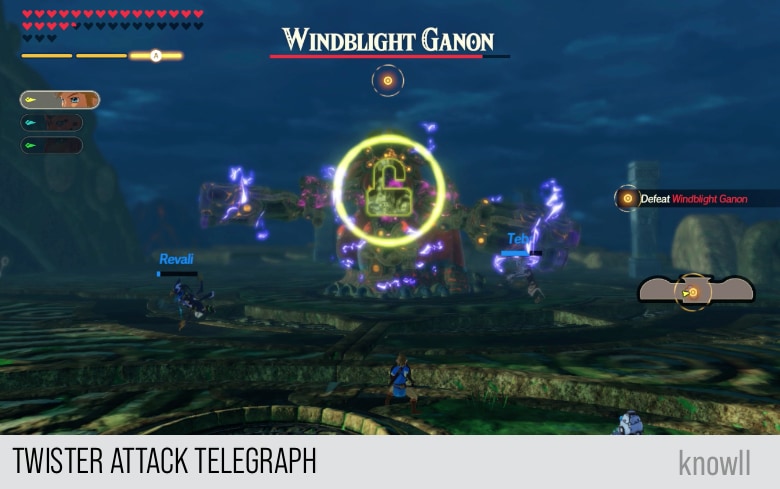
The monster opens its arms and then transforms into one huge tornado that will track you. As this is a spinning attack, you can do Stasis on it, even if the attack has already started.
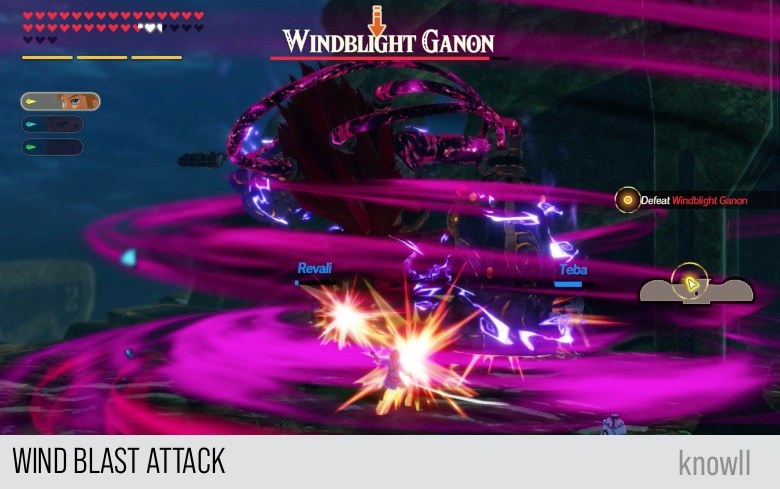
Windblast Attack
In this attack, the monster points his huge gun on the ground, as though charging it with energy.
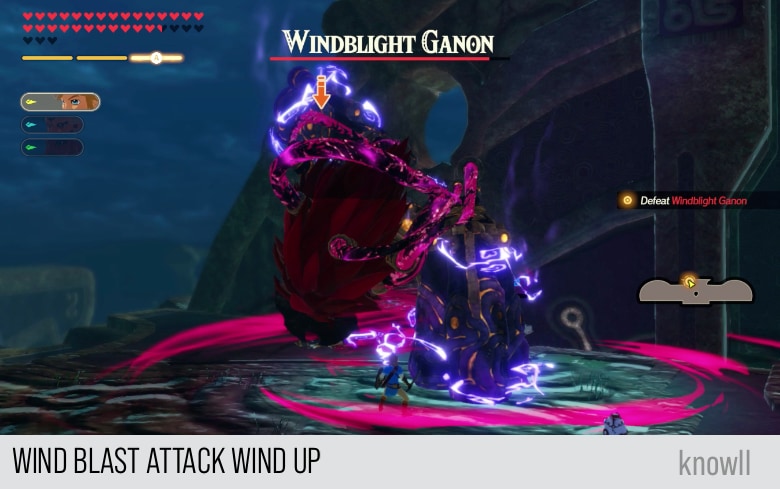
Then he pulls his arm up, causing a huge tornado that will cause you huge damage.
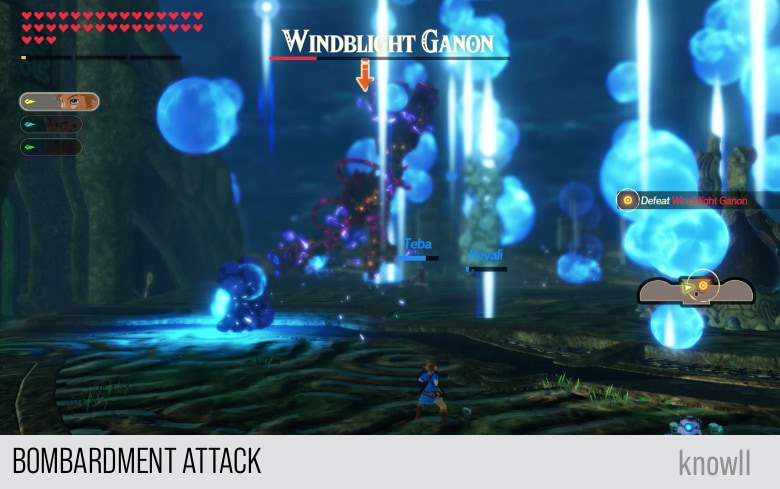
Bombardment Attack
This is one of the signature attacks of Windblight Ganon. It is equally powerful as well as flashy.
This attack does not have a telegraph that you can counter, but it has a very long wind up that makes it obvious when it is about to happen.
He raises up his left hand as though summoning the power of the winds and light.
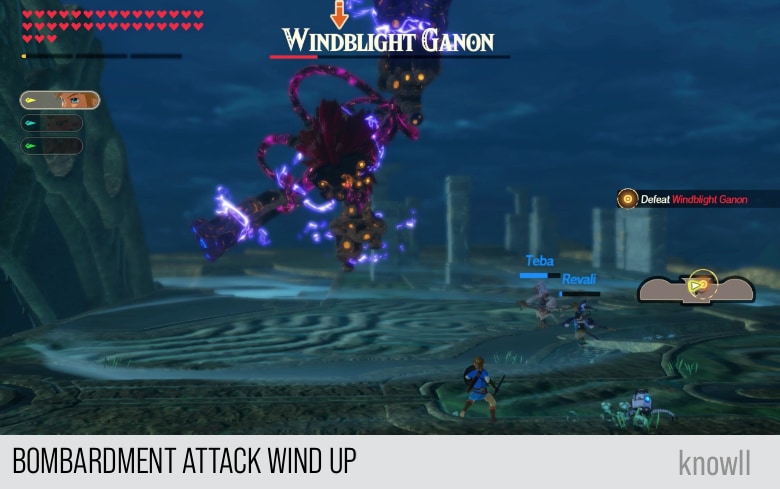
After a few seconds, the Bombardment attack will occur and explosions will be everywhere. If you are lucky, sometimes you will not even get hit even if you just stand amidst all the explosions.
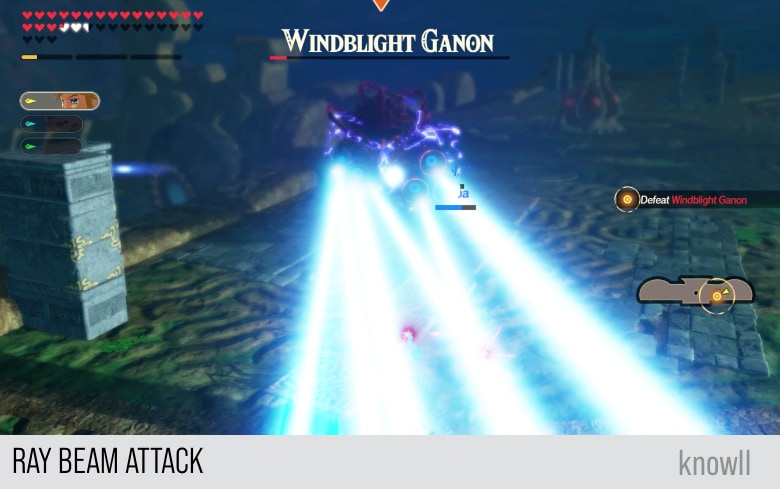
Ray Beam Attack
This is the most powerful attack and flashiest attack of Windblight Ganon. It is also a very rare attack, sometimes he does not do it in the whole fight.
This is the equivalent of Thunderblight Ganon's Lightning Beam Attack.
In the Ray Beam attack, Windblight Ganon begins with a wind up and a telegraph that you can counter with a Remote Bomb. It appears as though it is charging for a giant blast of energy.
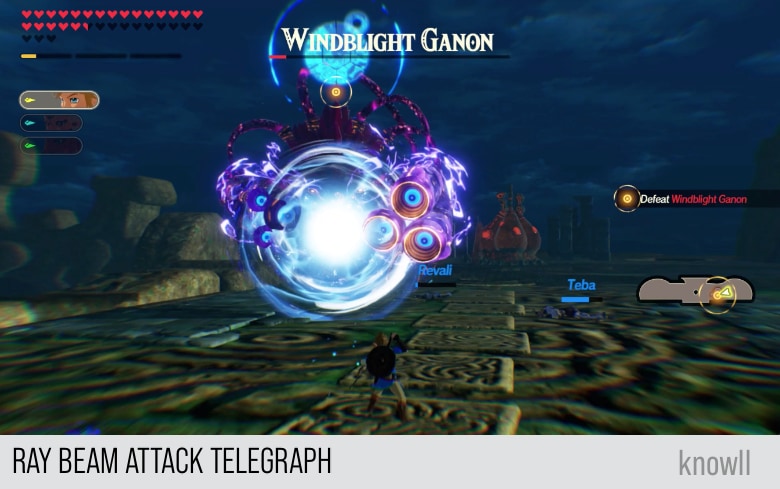
If you do not counter the attack, Windblight Ganon will release powerful beams of destruction.
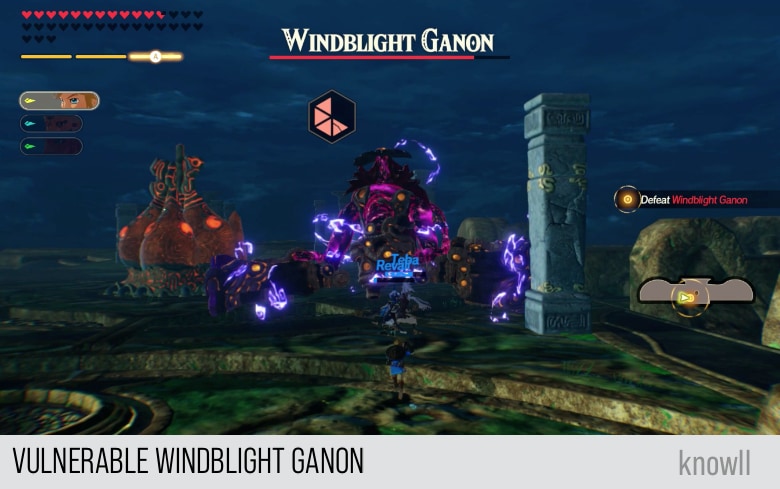
Once you have reduced the health of Windblight Ganon to a sliver, it will teleport and escape. You will not be able to fully destroy it in this fight.
Teba: All right! That thing must be finished by now.
Revali: Hardly. It just ran away for the time being.
Teba: We'd be in serious trouble if not for you, Link. It was an honor to fight by your side again.
Counterattack: Wind and Thunder
With the support of allies, the party subdues both Thunderblight and Windblight Ganon. There is little time to celebrate, as Zelda shares the news of the fall of Hyrule Castle.
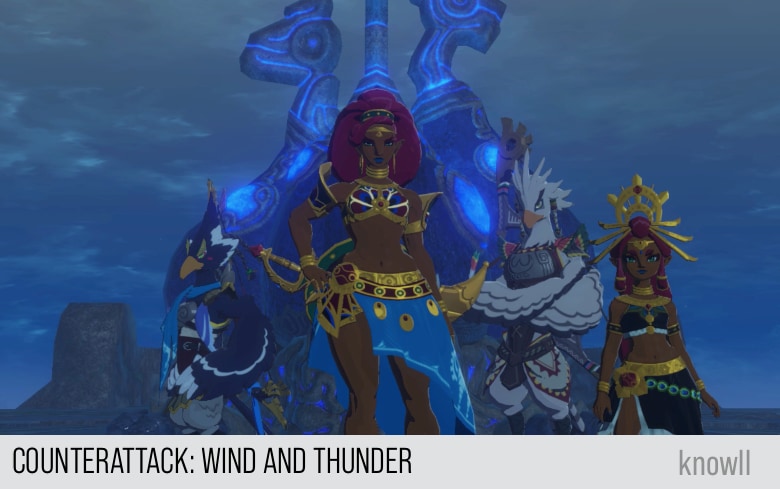
Urbosa: Now then... First, I owe you my gratitude. Thank you for your help. Truly.
Zelda: Urbosa...
Urbosa: And second... Riju, you said? We could not have prevailed without your aid.
Riju: I-I would not presume to take credit. We - all of us - fought as one.
Revali: Hmm. Well, we would've been just fine without you. But I suppose it's better that you were here.
Teba: I never thought the Champion would be so...
Urbosa: Hold that thought for now.
Urbosa: Little bird, please tell us what happened at Hyrule Castle.
Zelda: Well, you see...
Air and Lightning
With the aid of Teba and Riju, who had appeared within the Divine Beasts, Link and his forces were bolstered. Together, they successfully saved Revali and Urbosa.
Following Zelda's revelation of Hyrule Castle's fate, Revali and Teba steeled themselves. Readying to confront the horde of Guardians, the pair stepped into Vah Medoh once more.
Vah Medoh's Pilots
Having heard the news from Zelda of Hyrule Castle's fall, Revali takes Teba, and together they board Vah Medoh. The pair plan to use the power of the Divine Beast to halt the monsters and Guardians advancing on Western Hyrule.
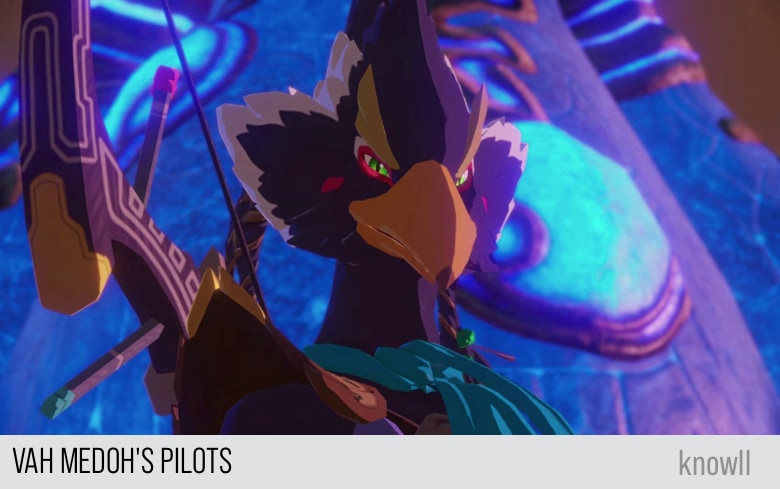
Teba: There he is, the Champion of the Rito.
Revali: Well, then. I suppose the time has finally come... to reveal Vah Medoh's divine power!
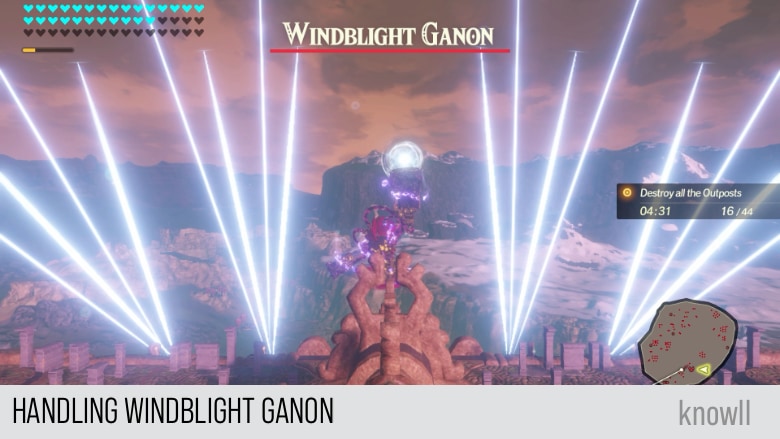
Objective: Destroy the Outposts
Your goal is to destroy 44 Outposts at the start of the quest. With the powers of the divine beast, you can easily achieve this. Note, though, that the objectives will change as you progress.
We have covered in the entry Freeing Korok Forest how to effectively fight enemies with Vah Medoh. You can view our Vah Medoh Guide for more tips.
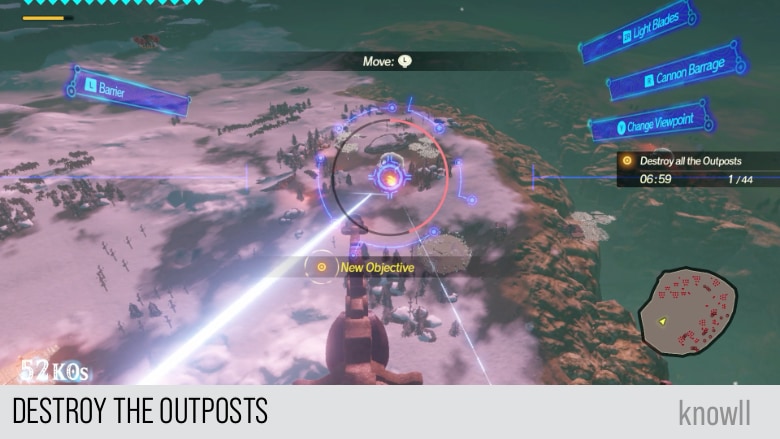
Revali: While we were trapped inside the Divine Beast, they went unchecked. That stops now.
Teba: I am with you, Master Revali. Let's take down outposts to stem the flow of enemies.
Possibility of Failing the Quest
Before we continue with the guide, let's share in advance that there is some possibility that you might fail this quest. We consider this Vah Medoh quest to be the most challenging Chapter quest in the whole game, for multiple reasons:
- This quest has a timer - You have to manage your time effectively to achieve the goals that change as you progress.
- This quest has a Blight Ganon - In addition to the objective you currently have, Thunderblight Ganon occasionally appears and attacks you with high damaging moves. There is a chance that he can reduce your health drastically.
- You need to maintain Vah Medoh's health - You will be facing attacks from enemies on the ground and in the air. Thunderblight Ganon attacks you as well.
If you fail this quest, you will get these comments:
Teba: Guh! This might be it for me...
Revali: I clearly... held back too much...
Tips for Success
There are two primary causes of failure for this quest:
- Running out of health
- Running out of time
The primary cause of running out of health is taking too much damage from Windblight Ganon. To preserve your health, there are three key strategies:
- Learn how to use the Barrier
- Learn when to attack and not attack enemies
- Learn how to handle Windblight Ganon
The Importance of the Barrier
The Barrier is your shield from any attacks, so it is crucial that you are aware that you can use it. You might not have used it before, but this time you will need it. The Barrier complements the second tip.
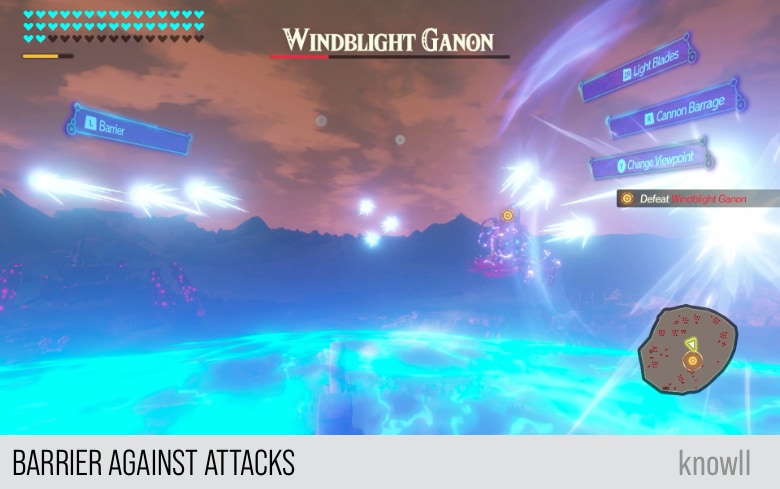
When to Attack and Not Attack Enemies
This is the key - your Light Blades attack has a cooldown. When it is on cooldown, you shield. When it's not on cooldown, you attack.
Let's say you are approaching a large number of flying Guardians. However, your Light Blades is on cooldown. Instead of attacking them one by one, and receiving damage in return, just shield. Your Light Blades can destroy them all in one go anyway.
Once your cooldown is over, then use the Light Blades.
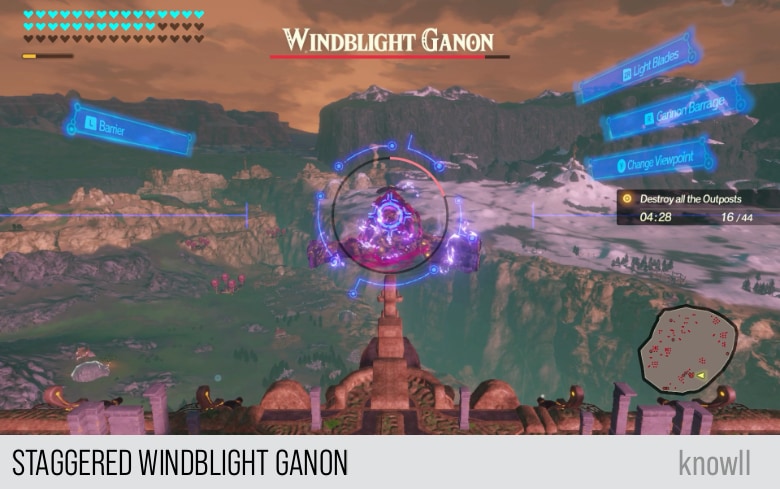
How to Handle Windblight Ganon
Windblight Ganon is the primary reason why this quest is challenging. But once you know how to handle him, your chance of success becomes much higher.
The first thing to do once Windblight Ganon appears is to "blind him". You do this by attacking him with your Light Blades. It will stagger him, making him open to your special attack.
As shared above, do not engage if your Light Blades is on cooldown. You must shield.
In the scene below, Windblight Ganon has just appeared, so we blind him.
After receiving the Light Blades attack, Windglight Ganon explodes and gets staggered. Now you can use this time to either:
- Blast him with your special attack
- If the special attack is not ready, hit him with your Cannon Barrage
Do not Ignore Windblight Ganon
The worst thing that you can do while doing this quest is to ignore Windblight Ganon. He will easily wreck your health, as he will just continuously shoot at you. So defeating him takes the highest priority in this quest. The faster you defeat him, the faster you can return to the objective.

And with those tips, go ahead and complete the objectives.
Revali: Their numbers are great, but no need to panic. Let's thoroughly wipe out the enemy outposts.
Teba: Time to clean up this mess.
Revali: Huh. It looks like Vah Medoh's output is increasing. I wonder... if it's because of you.
Teba: Not to overstate my importance, but... I'm glad my presence has done some good.
Revali: Time to let loose our superior strategy.
When you use your special attack on Windblight Ganon, he gets staggered and just accepts all the damage, until the special attack runs out.
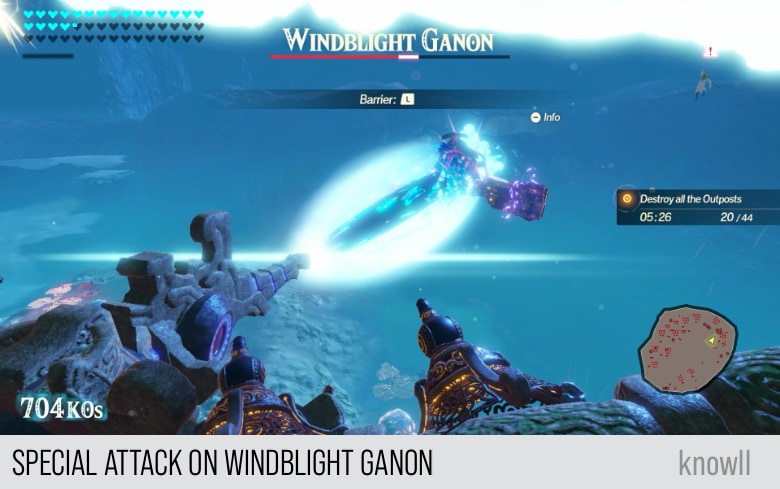
Once Windblight Ganon gets enough damage, he will escape and withdraw temporarily.
Teba: Did we finish it off this time?
Revali: No... He gave us the slip again. He's an expert at retreating, it seems.
Teba: I can't wait to tell the folks back home about this. Shame none of them will believe me...
Windblight Ganon has appeared!
Revali: Hmph. How unlucky for him that he appeared in front of Vah Medoh. Should we ask him to leave?
When Windblight Ganon returns, he is back to full health again. Hopefully, you have your gauge full so you can do a Special Attack on him. That will clear around 60% of his health.
Revali: We've done quite a bit of destruction. Let's show the same courtesy to the remaining outposts!
Teba: We have the moment. Let's keep it up!
Revali: You're from a hundred years in the future, right? Is my training ground still maintained in the village?
Teba: Yes. All your admirers train at the Flight Range. I take my son there often.
Once you have cleared the 44 Outposts, the timer will stop.
Windblight Ganon has appeared!
Like earlier, Windblight Ganon is again back to full health.
Teba: Oh, come on! How is it still coming for us?!
Revali: Some people never learn. Let's make them sorry they ever laid eyes on us!
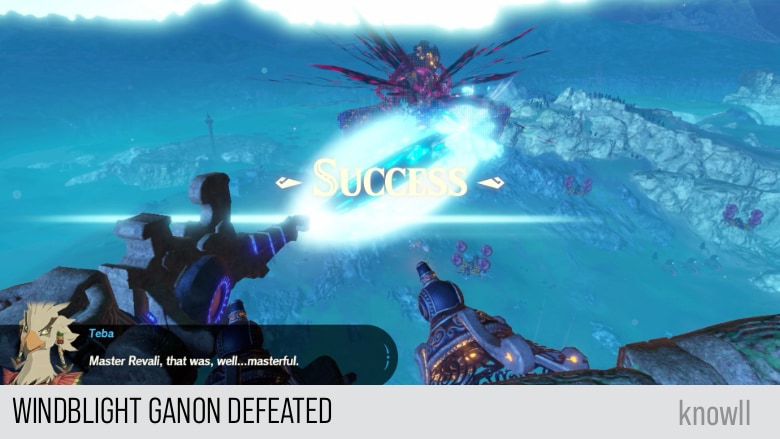
Teba: Master Revali, that was, well... masterful.
Revali: Yes... And you did well too, Teba. Picking a fight with us? Heh! They got off easy.
Characters Unlocked
As you move through the Chapters and later on with the Challenges and Quests, you will be unlocking characters that you can use for your party. This Chapter entry that you just completed rewards you with Riju and Teba.
If you would like to learn Riju's moveset and combat guide, view our Riju Guide.
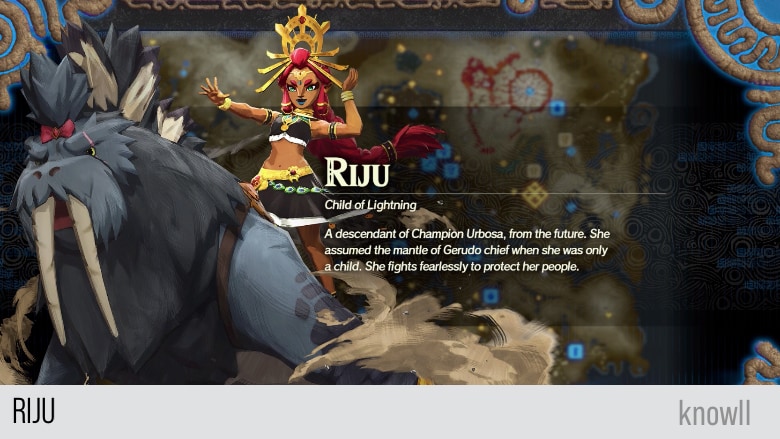
Child of Lightning. A descendant of Champion Urbosa, from the future. She assumed the mantle of Gerudo chief when she was only a child. She fights fearlessly to protect her people.
If you would like to learn Teba's moveset and combat guide, view our Teba Guide.
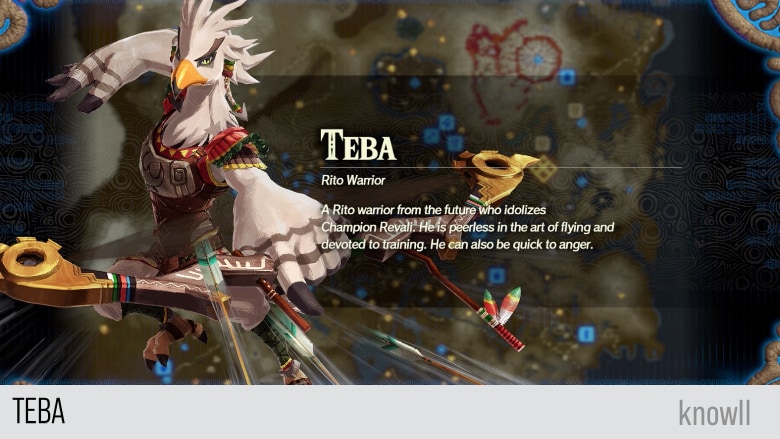
Rito Warrior. A Rito warrior from the future who idolizes Champion Revali. He is peerless in the art of flying and devoted to training. He can also be quick to anger.
Korok Locations
Every Chapter in the game contains Koroks. The main challenge is that there is no feature in the game that will make them appear on the map.
Hence, we provide all their locations on the area as well as on the map.
Total Koroks: 5
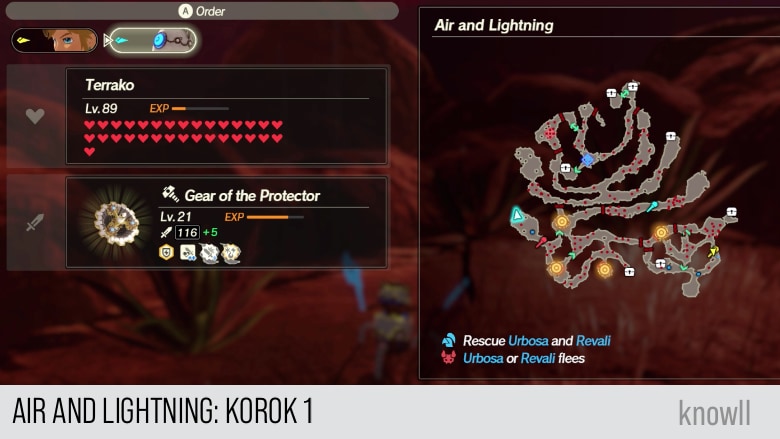
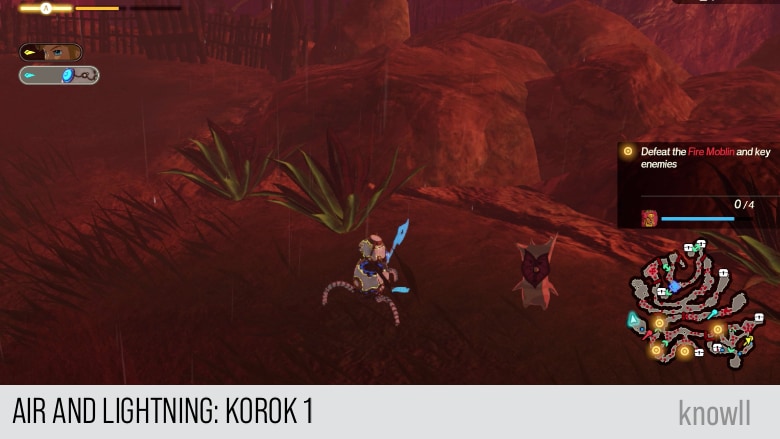
Air and Lightning Korok 1
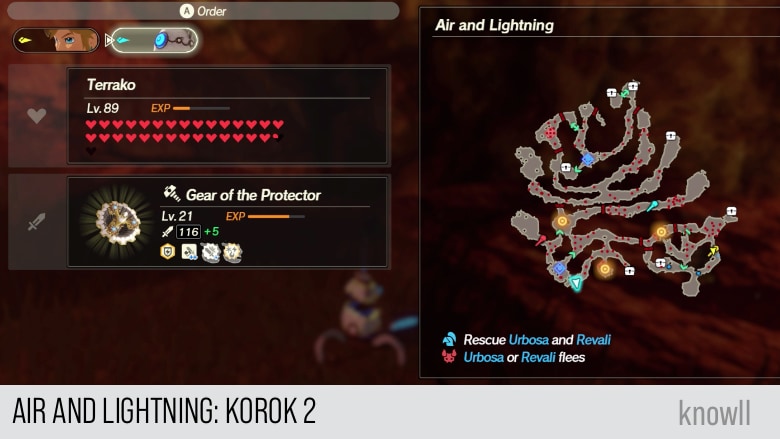
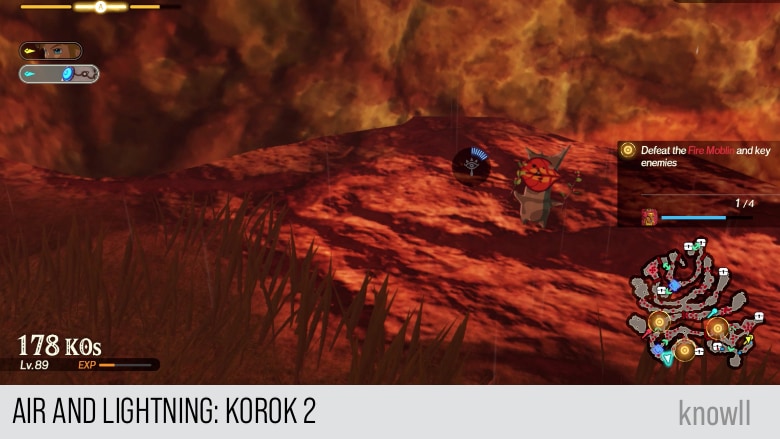
Air and Lightning Korok 2
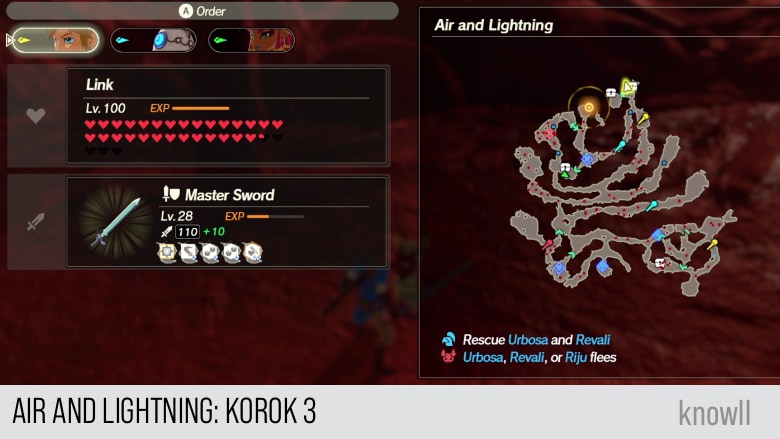
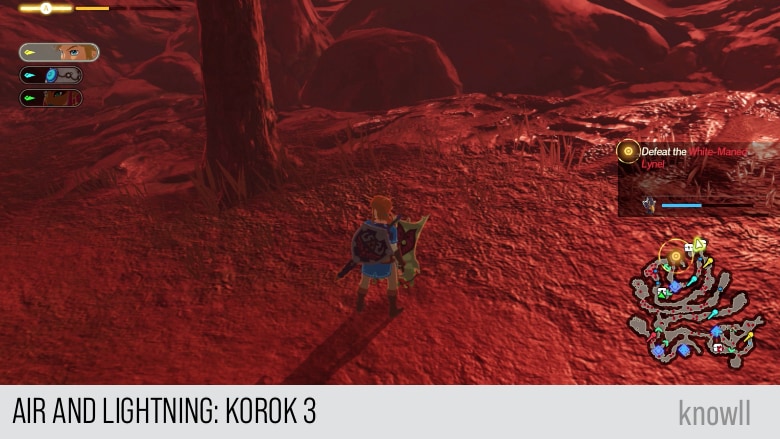
Air and Lightning Korok 3
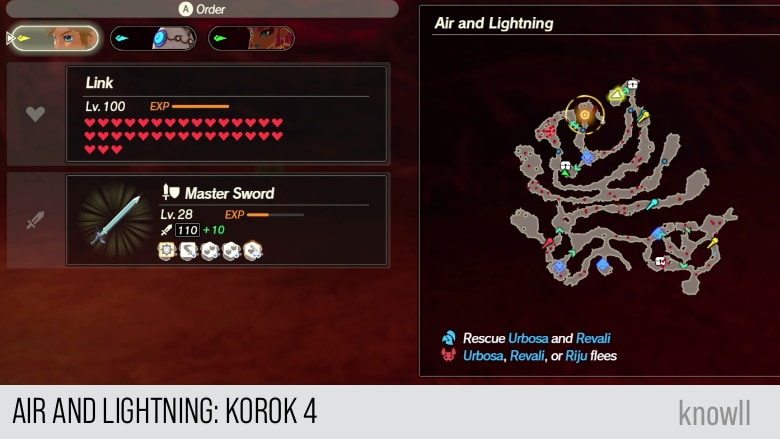
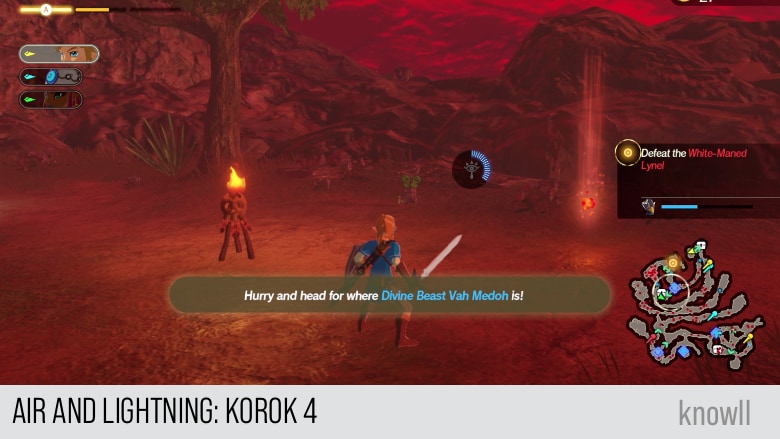
Air and Lightning Korok 4
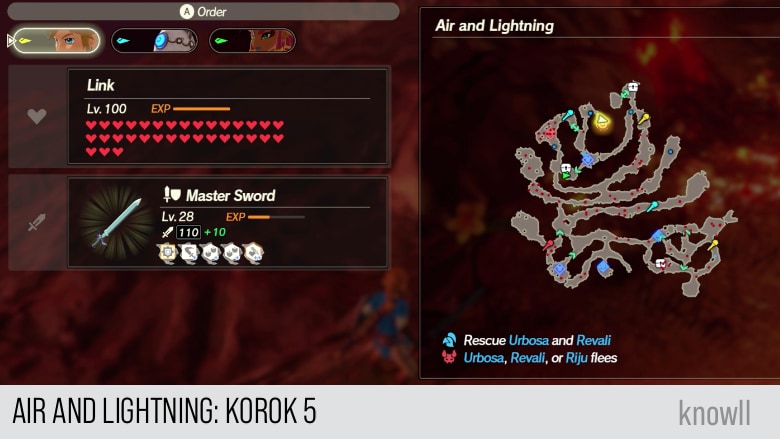
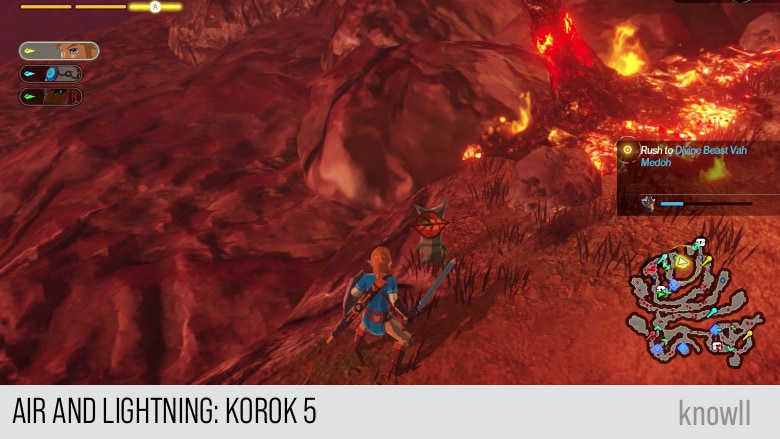
Air and Lightning Korok 5
Continue the adventure with our next Chapter entry Relentless as a Waterfall.