


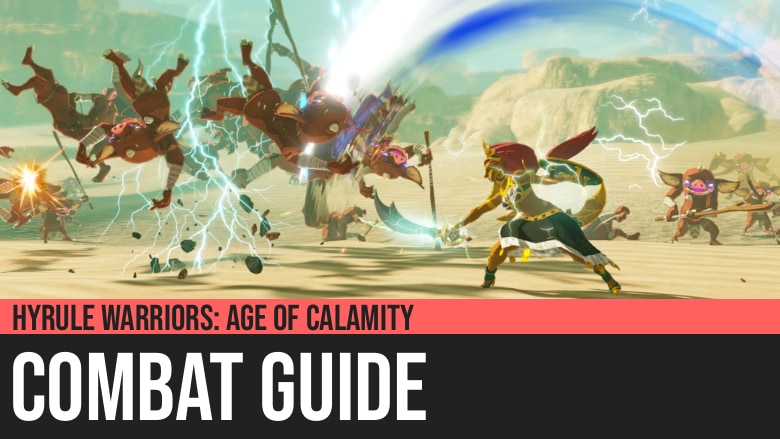
Hyrule Warriors: Age of Calamity - Combat Guide
Our Hyrule Warriors: Age of Calamity - Combat Guide is the best source of information for the combat of the game, giving advanced details on mechanics like Weak-Point Gauge, Rune Skills, Flurry-Rush, and Elemental Rods.
The main difference between the Age of Calamity (AoC) and Breath of the Wild (BOTW) is that AoC is an action game. It is a Warriors game where you are destined to become overpowered, beating hundreds of monsters using flashy moves, combos, and special attacks. AoC is not about surviving or struggling. Though it has a few Challenges that can give you some difficulties, they are few and far between. And when they do come, you will be glad they are there.
The goal of this guide is to make your monster-beating even more enjoyable. As shared above, you will become overpowered, whether you have a mastery of combat or not. But you will definitely enjoy the game more if you have more means to express that overwhelming power.
Master the Basics First
Before we continue, ensure that you know the basics first - like how to dodge, how to block, how to run, how to use the elemental rods, how to use the runes, and so on.
These topics are all covered in our Game Mechanics Guide. Give it a read first, then we can continue with the advanced topics below.

Master the Weak-Point Gauge
The first topic, and the most important topic of all, is the Weak-Point Gauge.
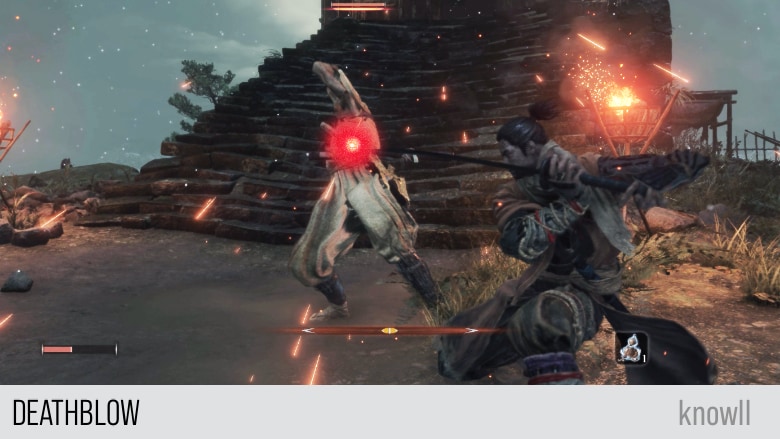
Let us make a quick analogy. Do you know what is the fastest way to defeat any enemy in Sekiro? Yes, the answer is by using the Deathblow mechanic. Whether it is a minion or a boss, the Deathblow is the most effective way to defeat an enemy in this game, because it clears the health bar fast.
In other games like Dark Souls, Bloodborne, and in Breath of the Wild, you clear the health bar of enemies by doing damage through your attacks. That is, by chipping their health away.
With Age of Calamity (AoC), we have the Weak-Point Gauge (WPG). If this is your first Hyrule Warriors game, then it might be new to you. It is a meter that once gets depleted, then the enemy is open to a devastating attack.
In the scenario below, you can focus on the Lynel's health bar or on his WPG. For major bosses, it's easier to clear that WPG than to chip into the health bar.
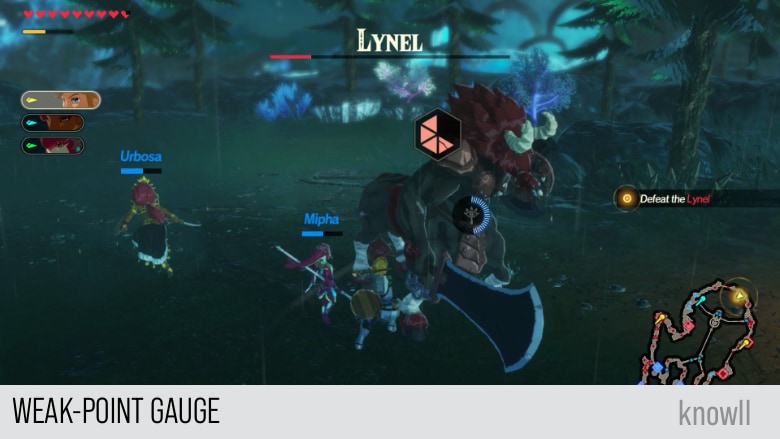
Once the WPG is cleared, the enemy is open to the Weak-Point Smash, which clears a large chunk of the health bar.
What makes the WPG concept even more powerful is that there are supporting mechanics that synergizes beautifully with it.
And these are:
- Attack Telegraphing and Countering
- Extending the WPG with Stasis
- Maximizing WPG clearance through Stasis Canceling
- Elemental Rods, weaknesses, and the WPG
- Dodging and Flurry-Rush Baiting
We will cover all of these topics and more below. The main takeaway here is that mastery of combat is centered around the concept of the Weak-Point Gauge.
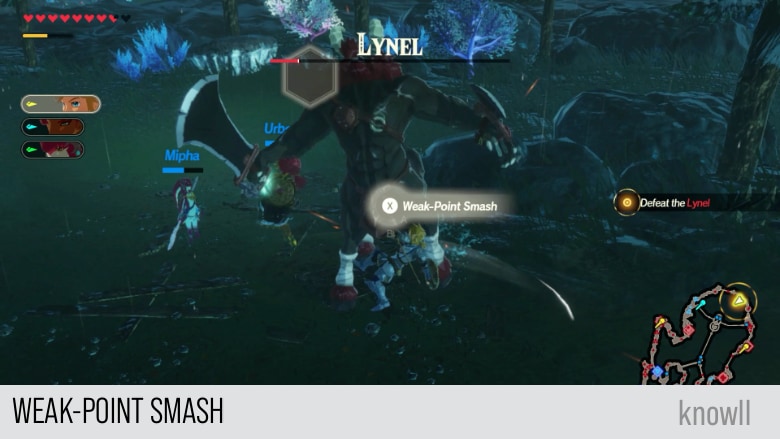
Master the Weak-Point Smash
Together with the WPG is the Weak-Point Smash. You clear the WPG with the goal of doing a smash at the end, where you can see the animation of your overpowered character clearing a large chunk of the enemy's health bar.
AoC is an extremely responsive game. It receives your input perfectly, like a Fighting Game. Whatever action you are doing, the moment the signal for the Weak-Point Smash appears, you will be able to do a smash.
The responsiveness of the game is phenomenal and is not limited to this scenario. You can cancel almost all actions in the game and do something else. This applies to the Runes and Rods as well. The moment you click the buttons for them, they show up without any delay. This is in direct contrast to the combat of Dark Souls or Monster Hunter where there is a large commitment to the actions you initiate.
What makes the Weak-Point Gauge Appear?
Knowing that the best way to clear the health bar of an enemy is through the WPG, it is in our interest to know what makes it appear, as you can only clear it when it is visible.
These are the scenarios when the WPG appears:
- After the enemy performs a strong attack
- After the enemy gets countered or staggered
- After the enemy receives an elemental rod attack
- During a Flurry Rush
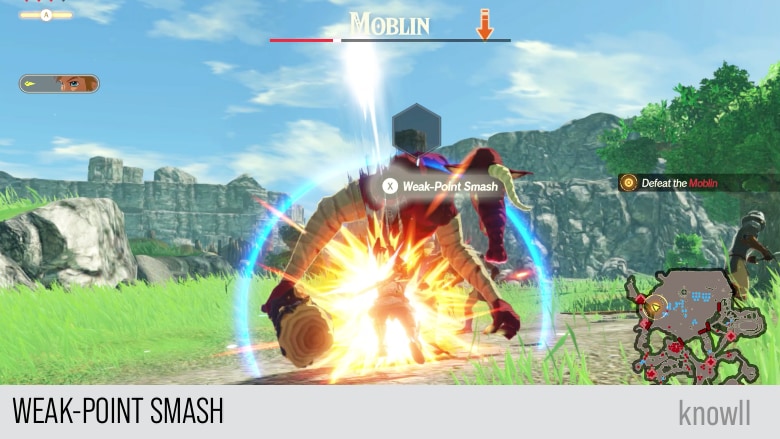
WPG After a Strong Attack
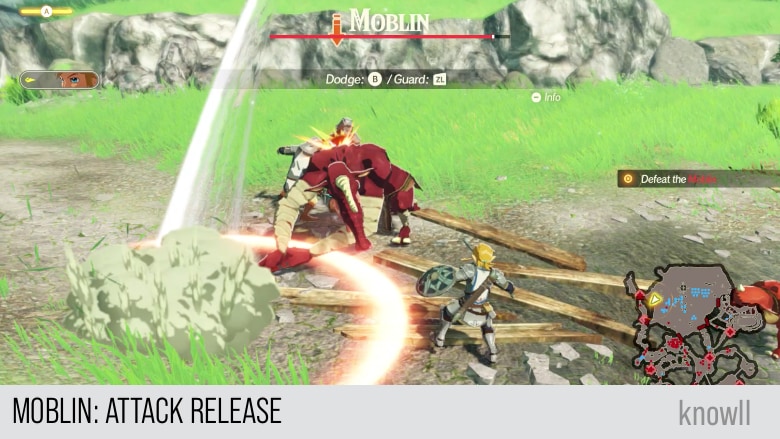
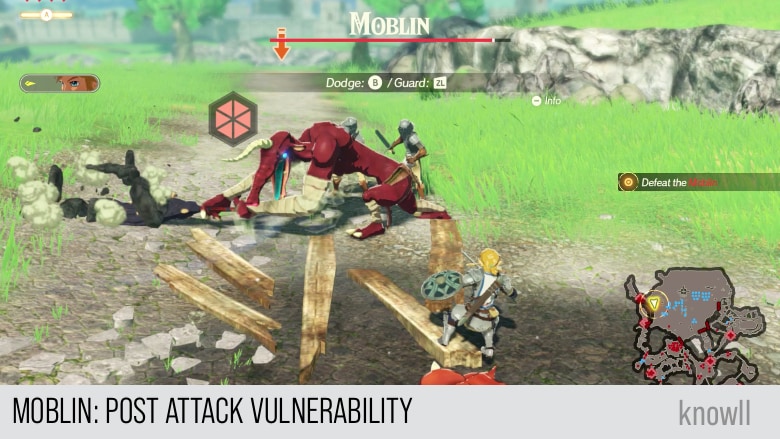
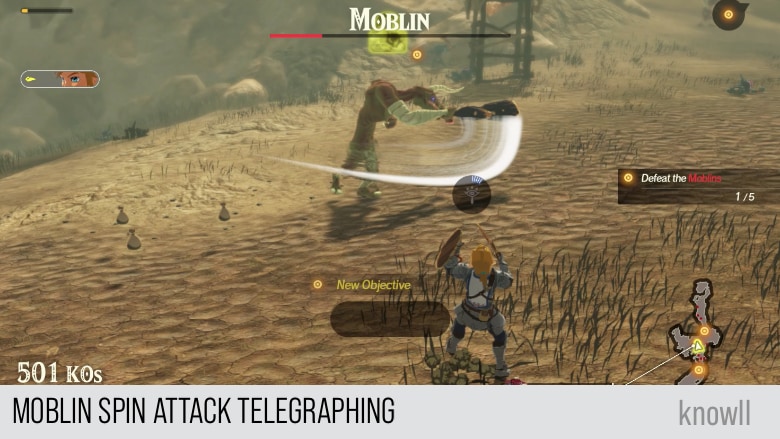
Each miniboss and boss in the game shows a WPG after a strong attack. Here is an example of a strong attack flow for a Moblin.
We have the attack wind up, as a sign for us to prepare a response - either we guard, we dodge, etc. The wind up signals also how strong an attack is. In this game, the longer and the slower the wind up, the more powerful that attack is.
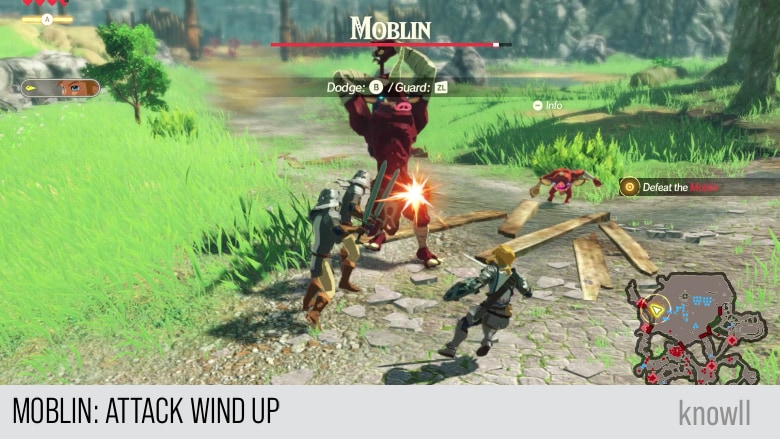
Then the attack gets executed. This is typically the part when the damage to your character occurs if you didn't do any response to the attack.
The monster then goes into a state of vulnerability, where he can be punished and his WPG cleared.
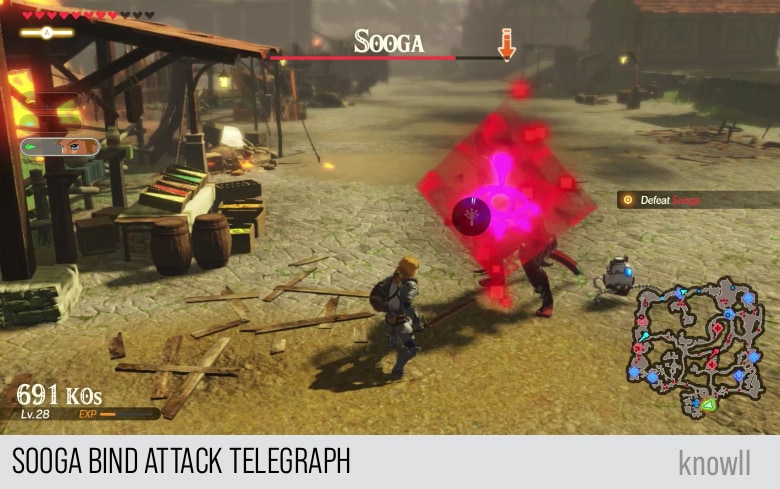
Let us repeat the same flow, this time using a real boss.
Here is Sooga performing his Bind Attack.
First, Sooga performs the wind up of his attack.
Then the actual attack executes.
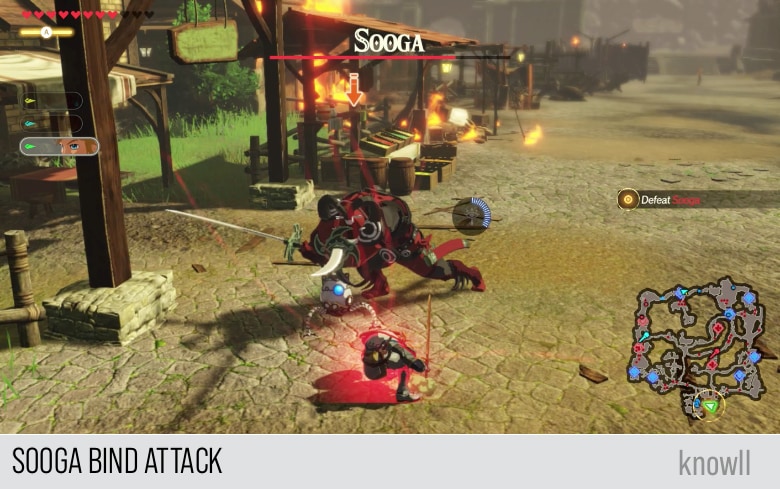
And finally, the WPG appears for Sooga.
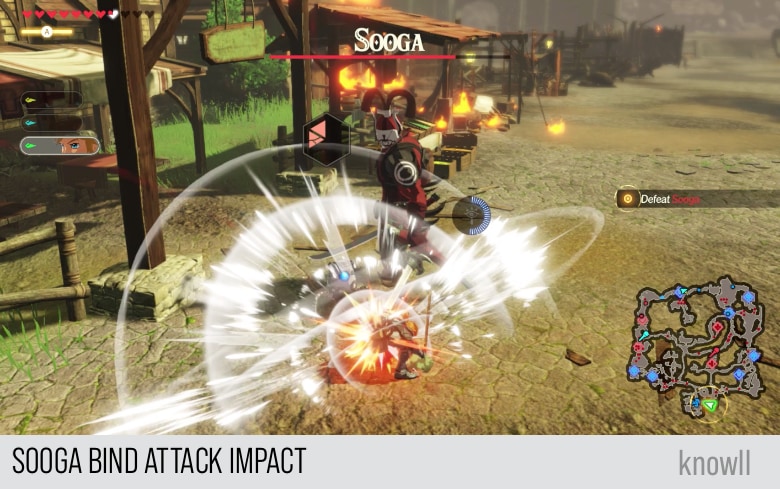
We demonstrated this flow twice to show that:
- The game rewards you if you respond correctly to an attack
- The game punishes the enemy by making it vulnerable after the attack
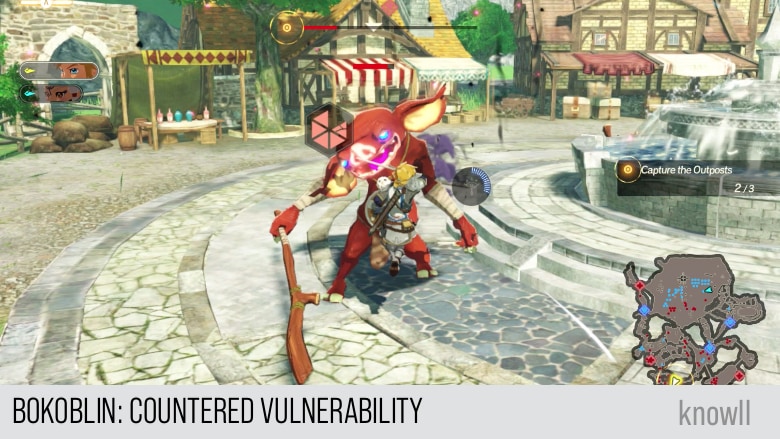
WPG After the Enemy Gets Countered
The Age of Calamity also introduced the mechanic of Telegraph vs. Rune Counter. When a miniboss or boss performs a strong attack, it typically has a telegraph, as shown below.

You will counter this with a corresponding Rune, which will result in the enemy showing his WPG and becoming vulnerable.
In this example, the telegraph shows the icon of Cryonis. By using this rune, you can create an ice pillar that counters the spear attack.
WPG After the Enemy Gets Staggered
Sometimes the enemy does not show a telegraph but still does a wind up before the attack. You can stagger them through your attacks like shooting arrows on Lynels or even on some bosses like Windblight Ganon.
When some enemies are about to attack, if you shoot them with an arrow, they will get staggered.
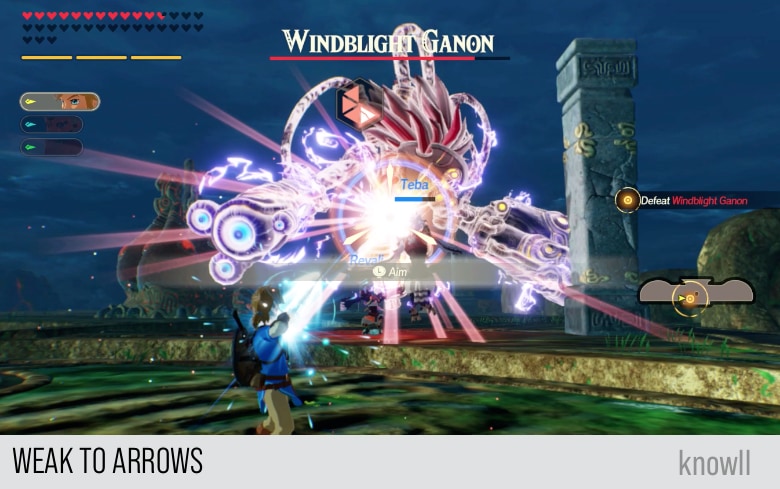
Once staggered, they will show their WPG for a brief moment.
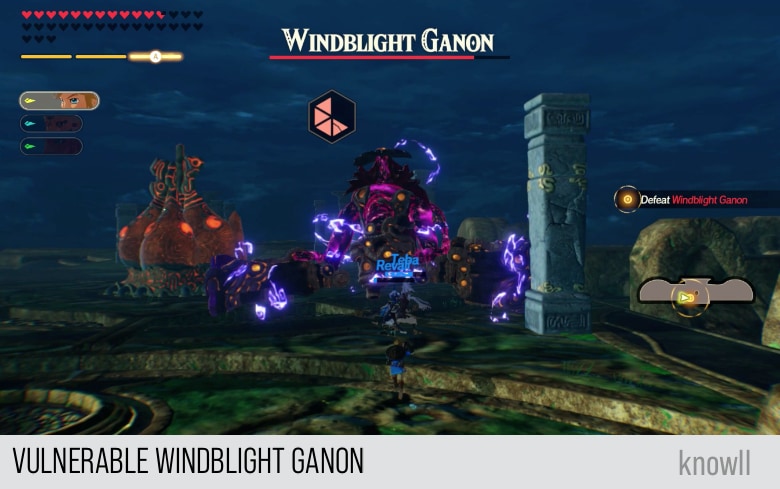
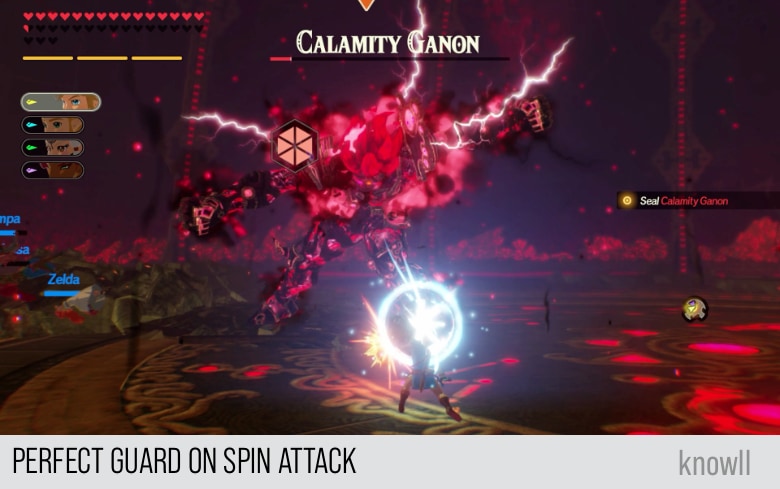
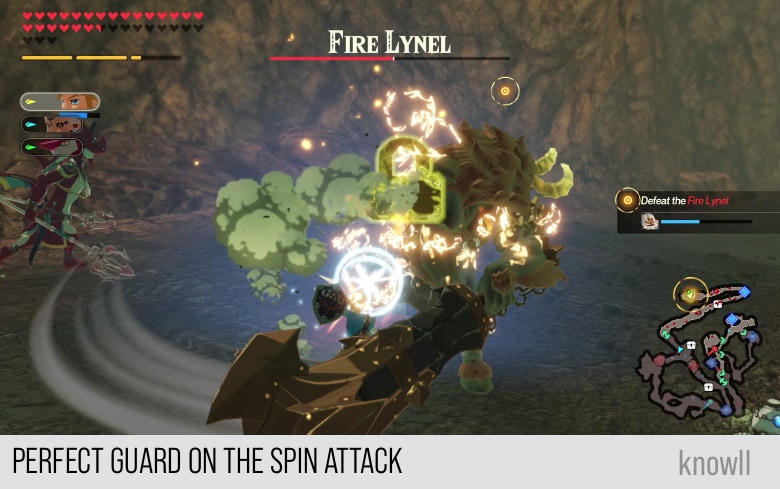
You can also stagger enemies by doing huge damage to them through attacks or by doing a perfect guard on a melee attack.
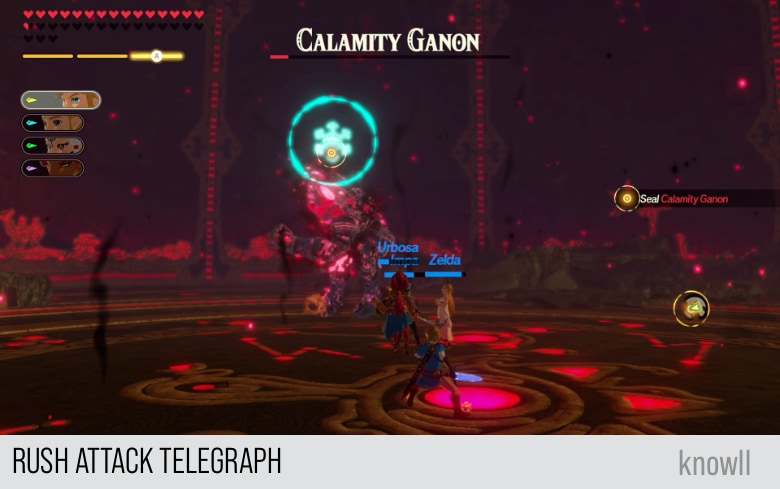
Here is Calamity Ganon doing his powerful Spin Attack.
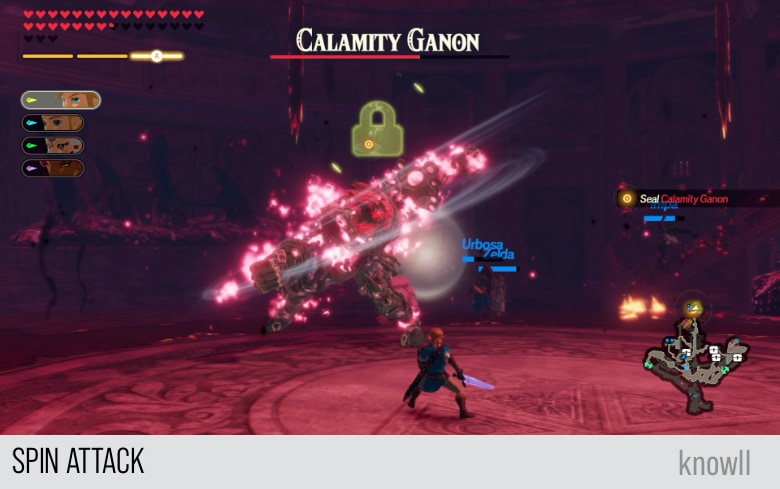
He shows his WPG after receiving a perfect guard.
WPG After an Elemental Rod Attack
This is one of the easiest ways to make the WPG appear. We will cover in another section below how to differentiate an optimal vs non-optimal elemental attack.
WPG During a Flurry Rush
Unlike the perfect guard, you can make the WPG appear if you dodge either a ranged or melee attack.
The WPG appeared here after dodging the bomb arrow, which is a ranged attack.
![]()
When you do a perfect guard on a ranged attack, the WPG will not appear.
![]()
And as expected, the WPG appears after dodging a melee attack.
WPG and Stasis
We are now familiar with the mechanics of the WPG and what makes it appear. Our next goal is to find out how to make it show longer, as you can only damage it while it is visible.
When you apply Stasis to an enemy, the WPG gets frozen as well. It will not disappear as long as the Stasis is in effect.
So, regardless of the reason why the WPG appeared, as long as it is showing, you can extend it by using Stasis.
Stasis Canceling
The only problem now is, when doing Stasis, some characters have a default action that makes the Stasis disappear after they execute that action.
Here are a few examples of such heroes.
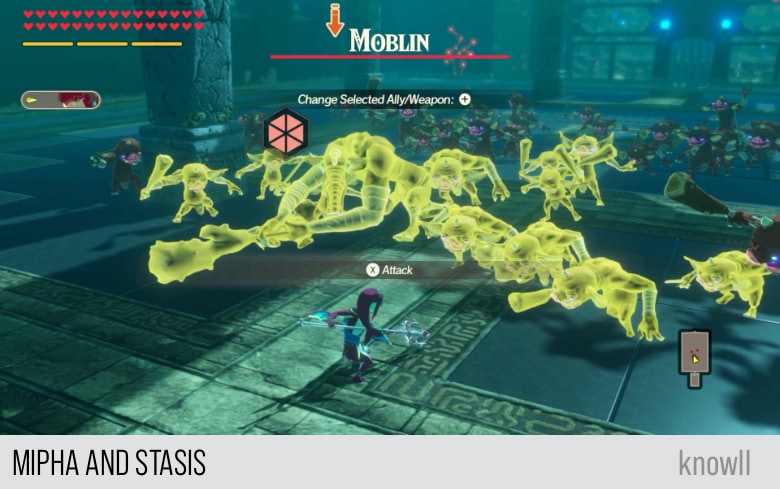
Mipha and Stasis
After doing Stasis with Mipha, she will prepare a spear attack as shown below. You will execute this attack by pressing X.
The moment you press X, the attack will execute, the Stasis will end, and of course, the WPG will not be extended.
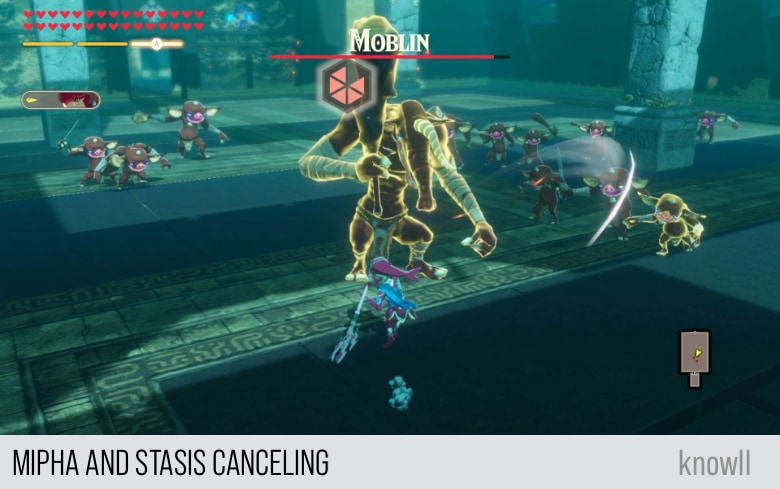
By doing Stasis Canceling, you can do custom actions on the enemy, instead of the default behavior. You achieve this by immediately dodging after doing Stasis. That is, you press the B button after you apply stasis.
In the scene below, Mipha cancels her default action by dodging and then attacks the monster still in Stasis.
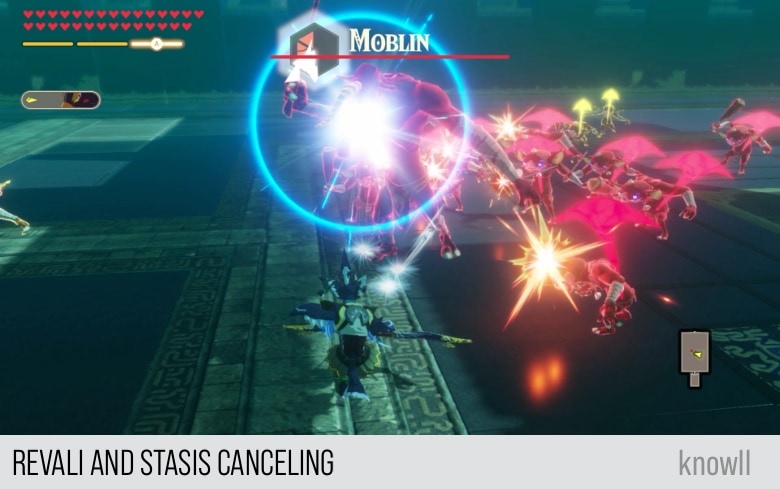
Revali and Stasis
Revali is similar to Mipha, except that he does not even take a button action to execute his programmed behavior. The moment you Stasis an enemy with Revali, he will immediately shoot arrows to the air, and when the attack completes, the Stasis will end.

You can still do Stasis canceling with Revali though. You dodge the moment he shoots the arrows, and then you can start attacking, as shown below. This way, you get the benefit of both.
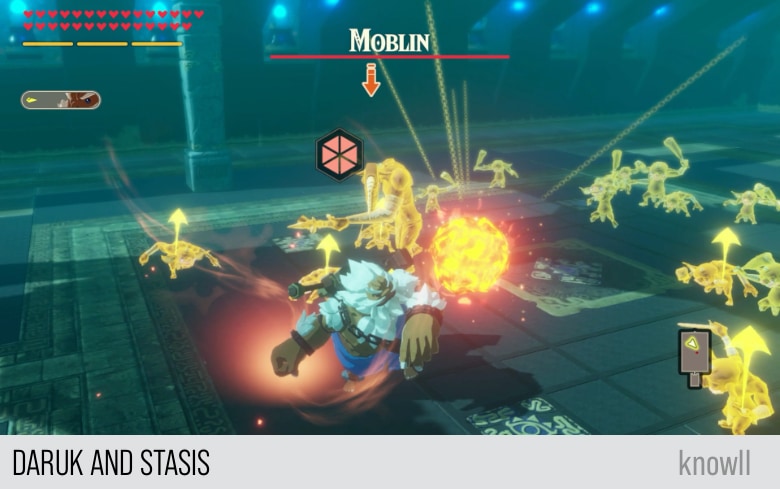
Daruk and Stasis
Daruk is somehow similar to Revali, in that he performs a custom action after the Stasis. However, with Daruk, you can't do Stasis canceling, as the dodge action does not interrupt his programmed behavior. Hence this attack is all the damage you can do after placing a monster in Stasis while his WPG is visible.
WPG and Elemental Rods
In the Elemental Rods Guide, we shared the biggest secret of the game - that the Elemental Rods are the most powerful weapons in the entire game. View our guide if you would like to find out why.
With respect to WPG, the elemental rods will always make it appear. But there is more, we have the concept of optimal elemental attacks.
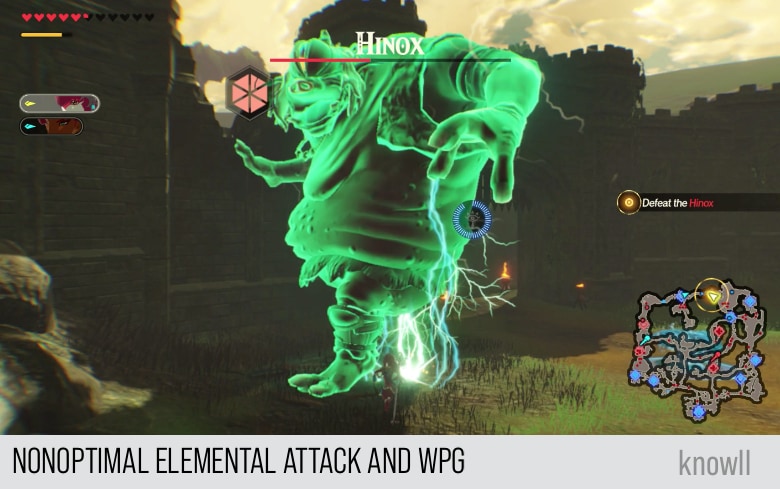
You can clear the WPG even faster if you know how to produce an optimal elemental attack. Let's show this with a demo.
We are preparing a Lightning attack on the Hinox below.
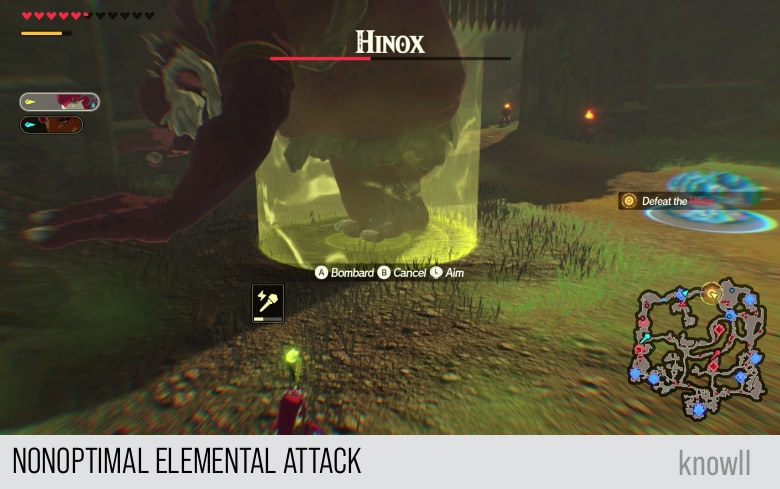
The moment we execute the attack, the WPG will appear.
This is the normal WPG that we have known until now.
By using optimal elemental attacks, we can make that WPG weaker to attacks and faster to clear.
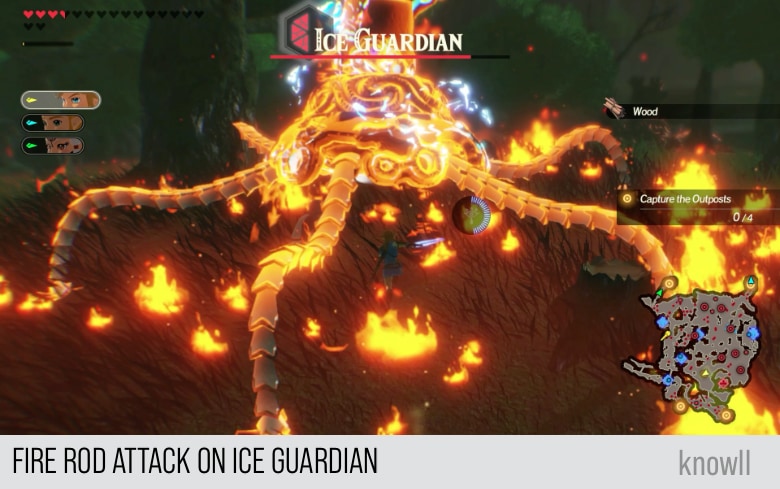
Here is the same Hinox using a Fire Rod.
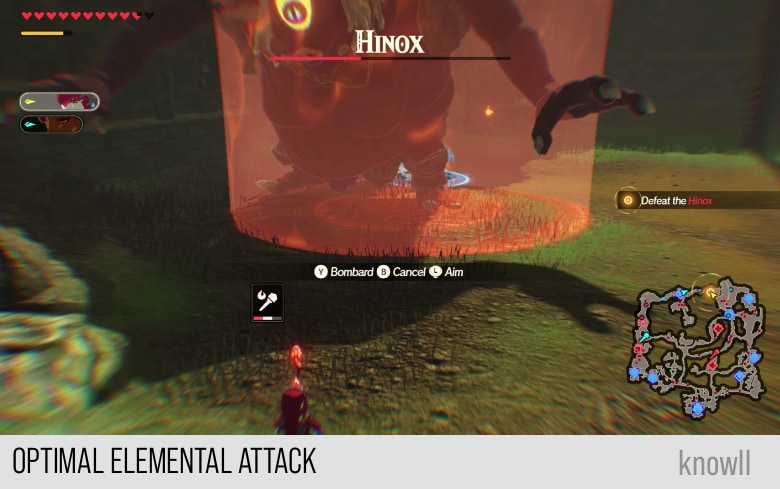
Because the Hinox is standing on grass, there is an additional burning effect on him. Though he is neutral to Fire, the attack became an optimal elemental attack.
His WPG became brittle and easier to clear.
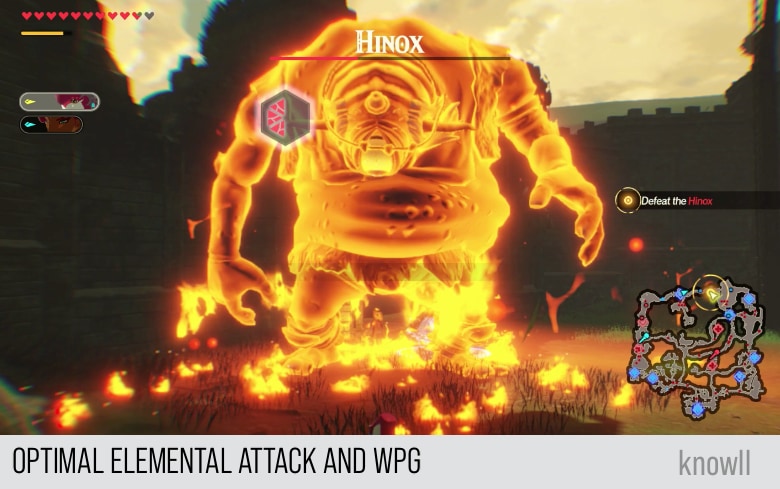
Sometimes the environment does not provide any advantages to your elemental attack, however, the monster could have an elemental weakness. This will produce an optimal attack as well, as shown in the below examples.
Using an Ice Rod on a Fire elemental will produce an optimal attack, even if there is no water nearby.
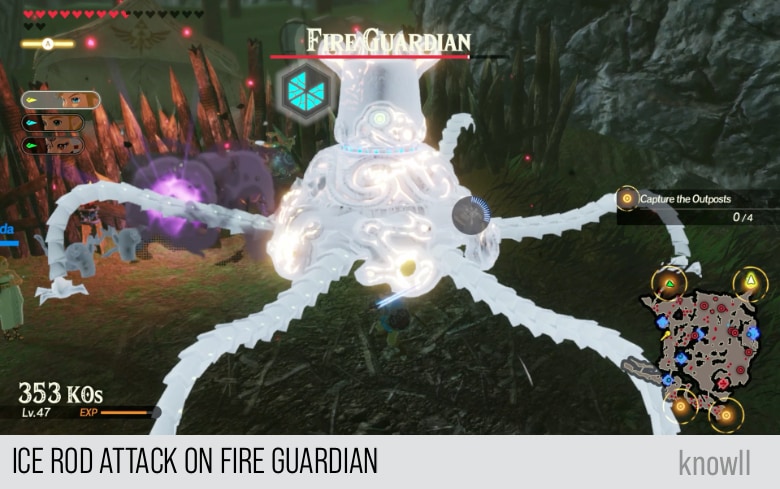
The below Ice Guardian is in big trouble because he is weak to the Fire Rod and he is on top of the grass that can easily burn.
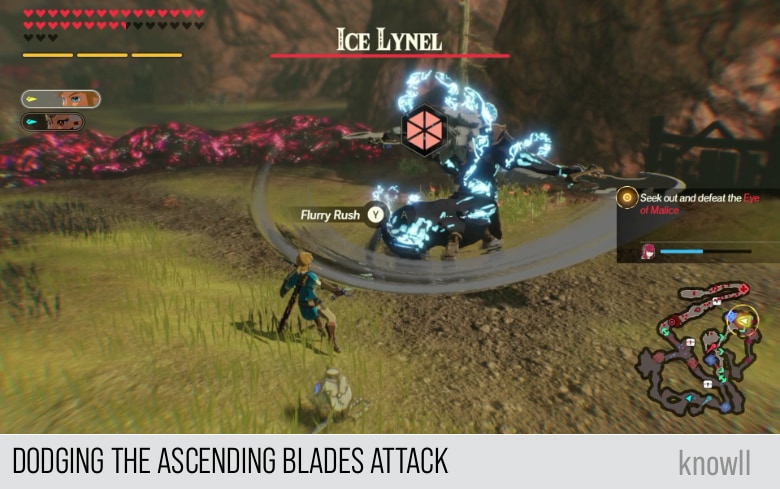
Dodging and Flurry-Rush Baiting
Another easy way of making the WPG appear is by dodging, which leads to Flurry-Rush baiting. In the Age of Calamity, dodging has been enhanced and made much better.
Just take for example the action Backflip, which is the default dodge action in the game.
Backflip in AoC is achieved by just pressing a single button, the B button. To do a backflip in BOTW, you need to be:
- Shielding - pressing ZR
- Moving the Left Analog Stick backward
- Pressing B at the right moment
You can see above how easy the game makes dodging attacks by reducing three separate actions into just a single button press. And dodging is the key to making a successful Flurry Rush.
You can actually fish and bait for Flurry Rushes in this game easily, either by doing a Backflip, which is extremely easy and safe, or a side dodge.
Here is the same attack being avoided by two kinds of dodge.
You can use the Backflip and fish for a Flurry Rush.
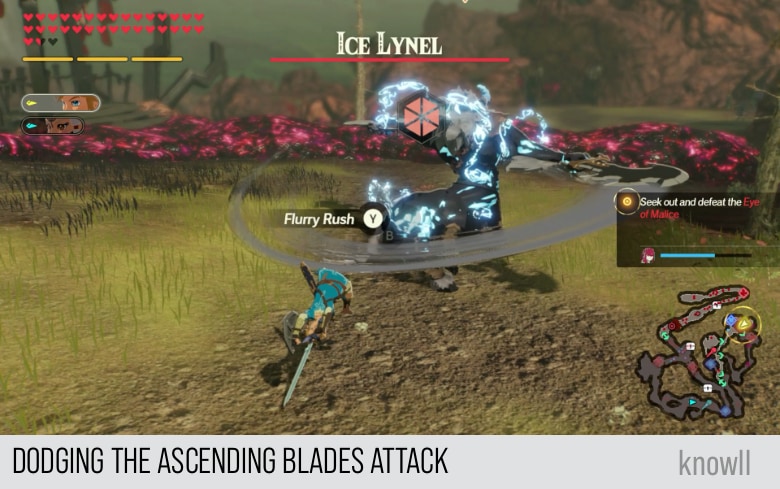
Or you can do a side dodge to get the same.
Master Attack Telegraphing
One of the big combat improvements in AoC is that they introduced the concept of Attack Telegraphing in the game.
The Attack Telegraph is the icon you see during the wind up of a strong attack.
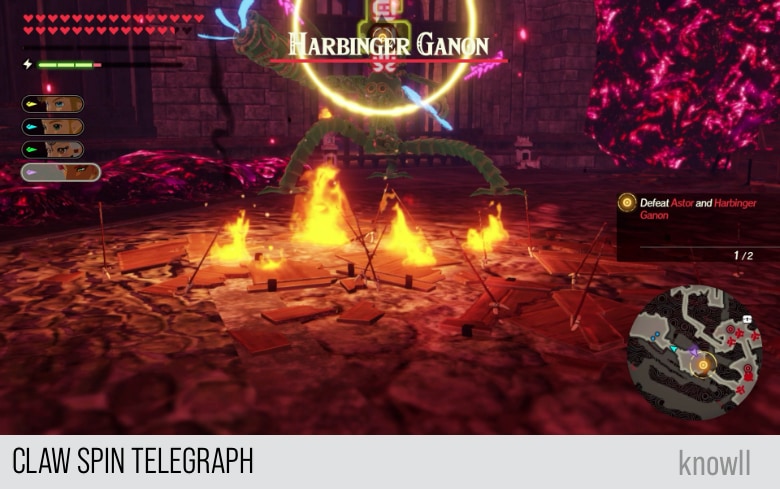
Here is Harbinger Ganon telegraphing its Claw Spin Attack. You can see the Stasis icon. That is the rune to counter this attack.
And here it is telegraphing its Claw Rush attack. You can see the Cryonis icon, which you can use to counter the attack.
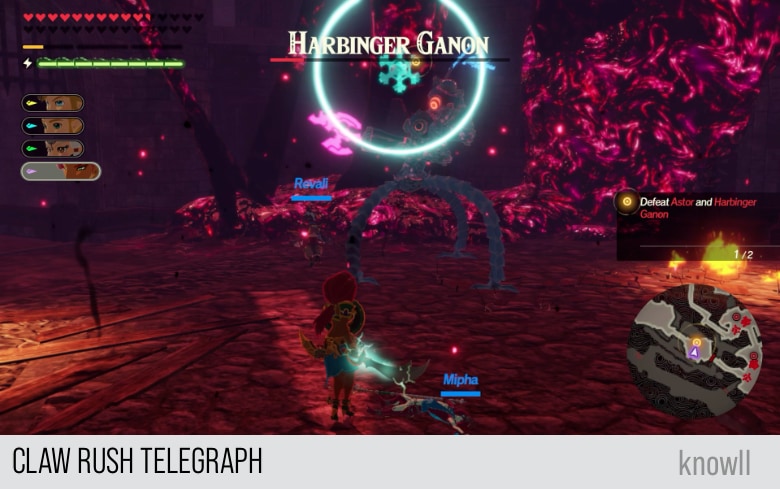
By being mindful of the various kinds of telegraphs, you can easily punish the minibosses and bosses of the game.
Spear Attacks
Most major enemies using spears telegraph a thrust attack, which you can counter with Cryonis.
Once the enemy hits the ice pillar, it becomes staggered and open to WPG clearing.
A variation of the Spear / Thrust attacks are the Rush Attacks. These are the attacks where the boss will immediately move towards you after showing the telegraph.
Note that they do not need to have a spear or any weapon to do this. What they all have in common is that they telegraph the Cryonis Icon and they move fast after the wind up.
Here are a few examples.
In the scene below, Ganon does not need any weapon to do the Rush Attack. He literally runs fast toward you.
And here is a Lynel preparing to run towards you with its Rush Attack.

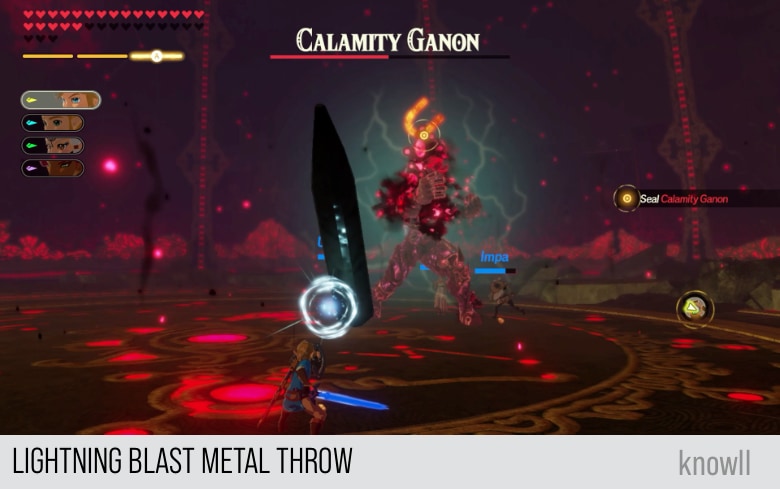
Throwable Metal Weapon Attacks
Most of the major monsters showing this telegraph are using a metal hammer as shown below. The moment you see a miniboss or a boss carrying that weapon, you know he will throw it at you.
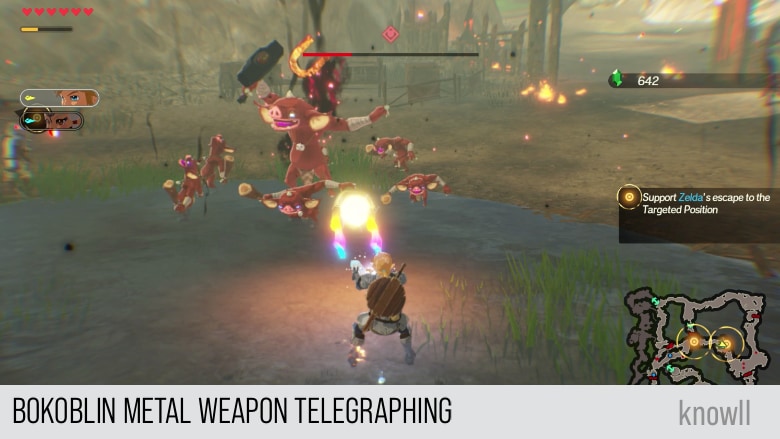
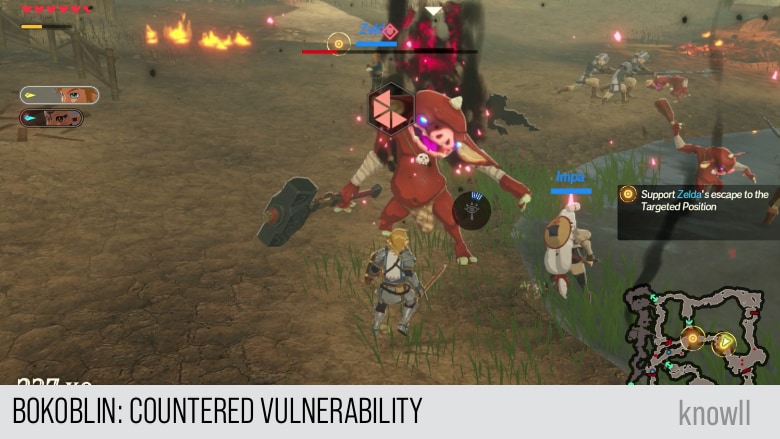
You counter this attack with Magnesis, which will return back the weapon to the monster and explode it in his face. The monster will then become vulnerable, open to WPG clearing.
Note that bosses do not need to be using a metal weapon to do the telegraph.
Here is Calamity Ganon doing a metal throw for his Lightning Blast Attack. You can see the Magnesis icon as well. He summons this metal out of nowhere.
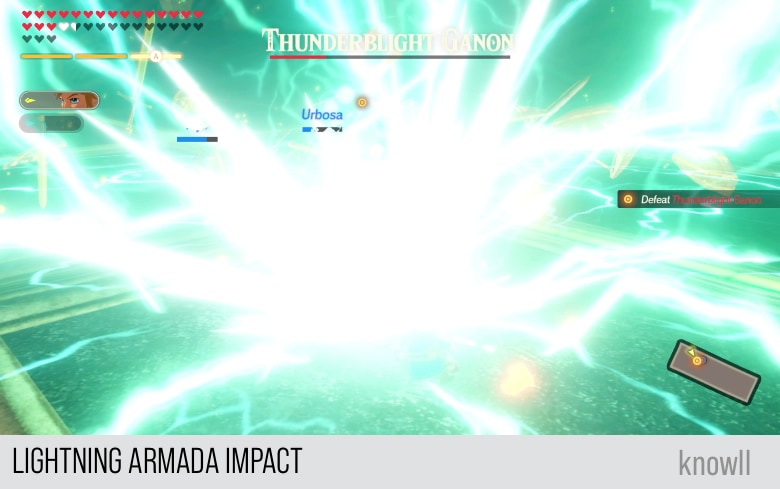
And here is Thunderblight Ganon telegraphing the same, even though he does not really throw his own weapon. He throws at you the largest collection of weapons and shields that he can summon.
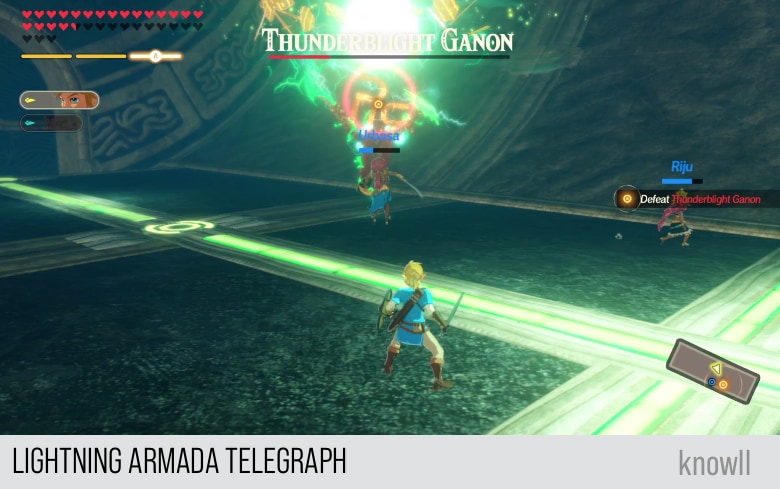
This will slowly approach you.
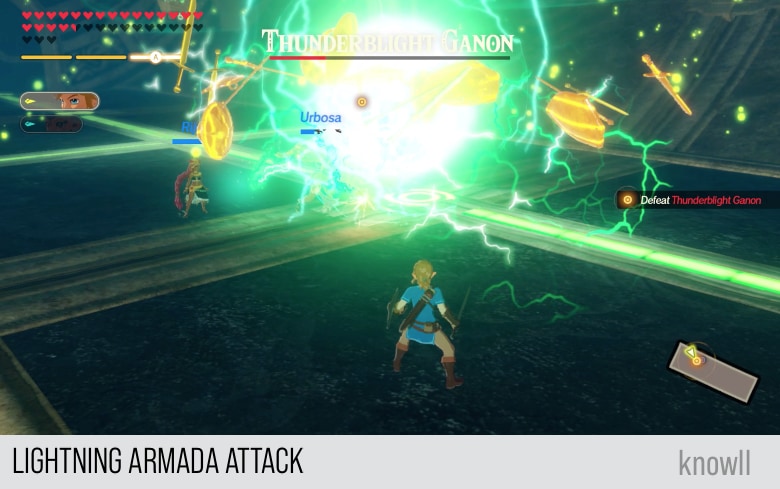
If you fail to respond properly, you will see a devastating light-show.
Spinning Attacks
Spinning attacks are countered by Magnesis. As you have already known by now, a boss does not need any weapon to telegraph this.
Most minibosses though do this when they have a one-handed weapon.
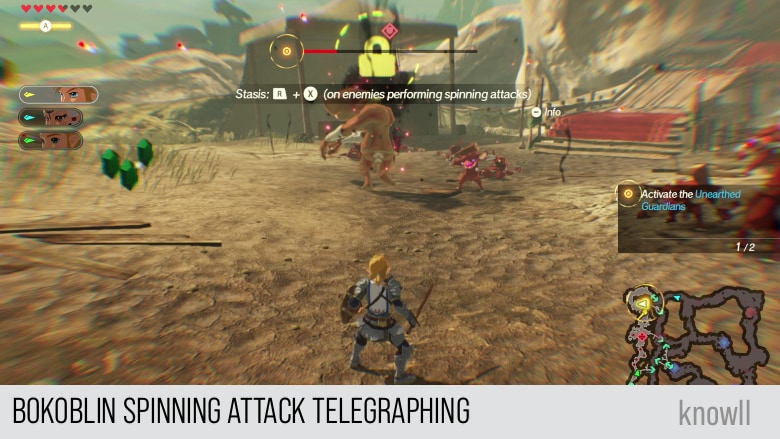
This is common for both Bokoblins and Moblins.
For Lynels, they have to be using a two-handed weapon to do the Spin attack.
And for bosses, they can be as creative as can be to do it.
In the case of Fireblight Ganon, he uses his hair to do the Fire Twister Attack.
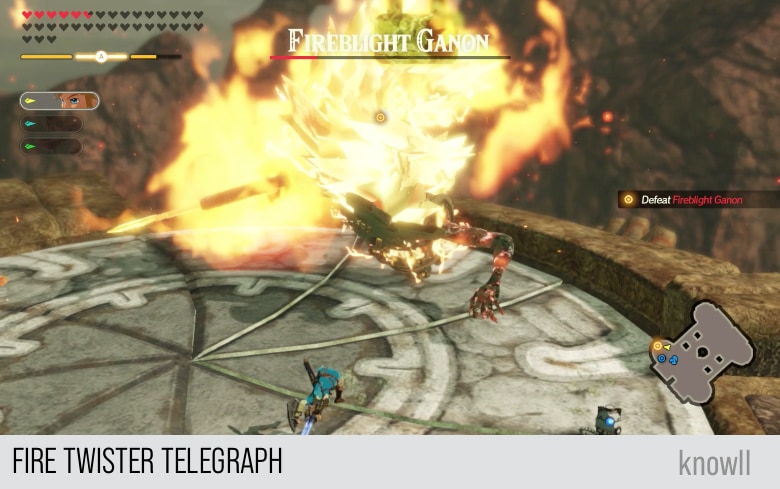
And for Calamity Ganon, he uses his hands.
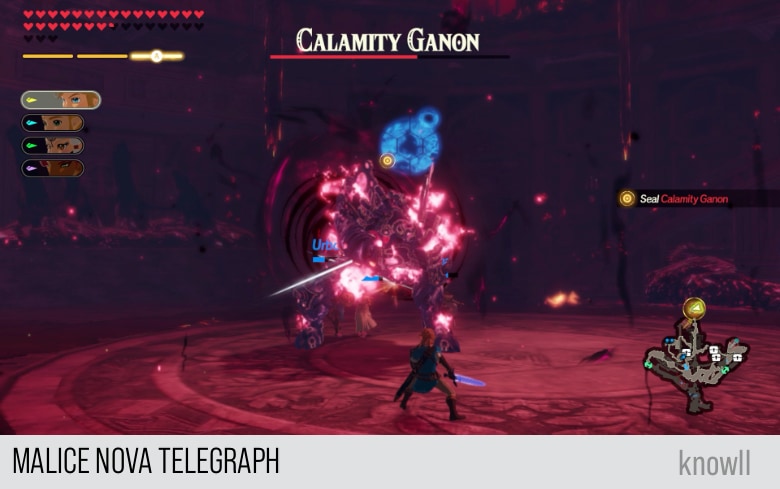
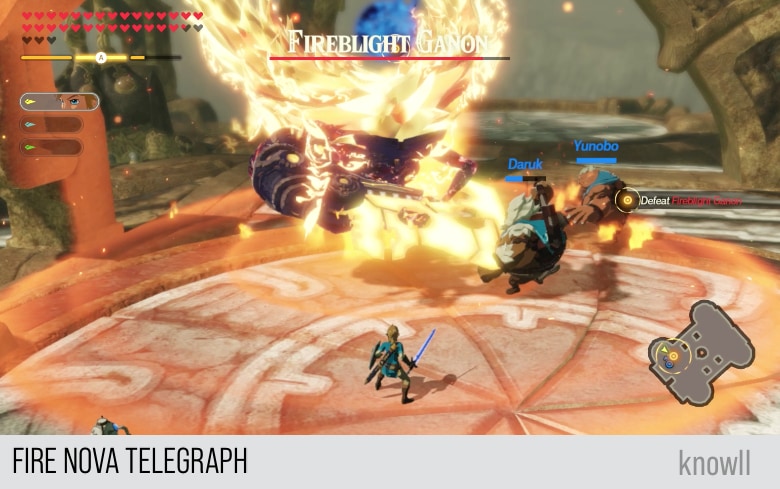
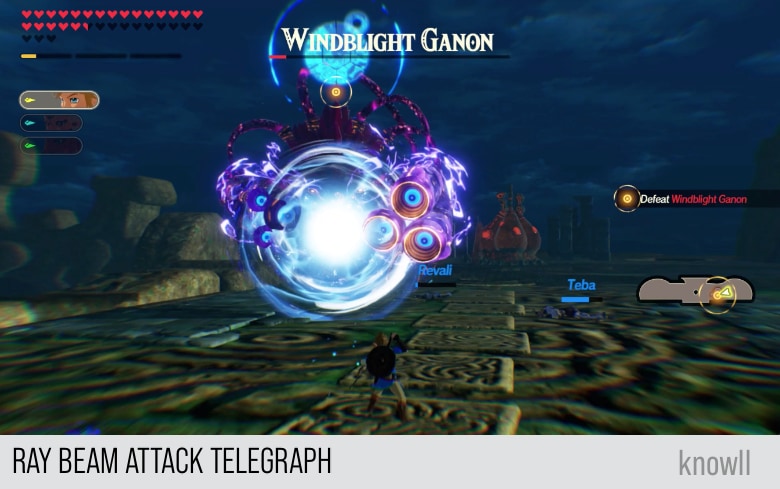
AOE Attacks
The most powerful attacks in the game are those that are slow in their wind up and take a long time to telegraph.
This is the game telling you that it's your fault if you get destroyed by this attack.
The most powerful attacks in the whole game are actually AOE attacks and are well-telegraphed.
Here is the most powerful attack in the game, Malice Nova. It is telegraphed with the Bomb icon and can be countered with Remote Bombs.
Here is the most powerful attack of Fireblight Ganon, Fire Nova.
Here is the most powerful attack of Windblight Ganon, Ray Beam.
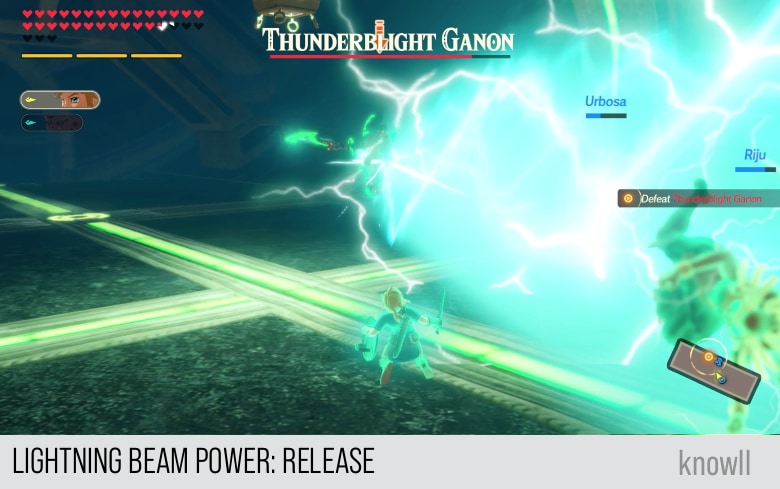
And lastly, the most powerful attack of Thunderblight Ganon, Lightning Beam.
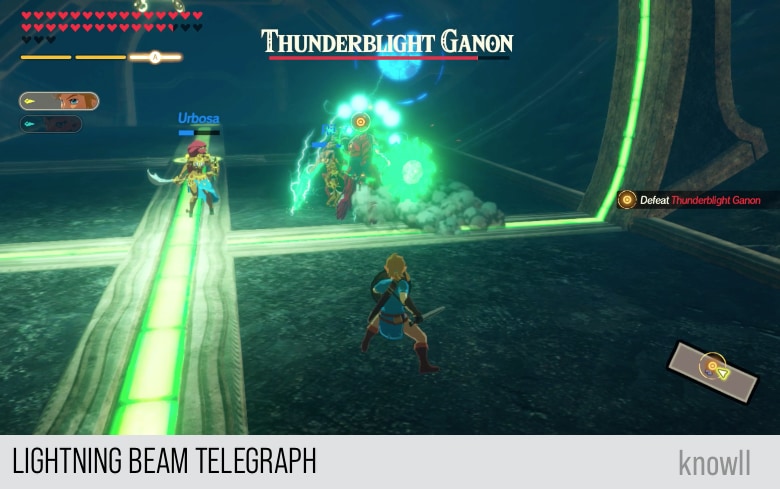
This attack can destroy all enemies hit by the beam, but only if it hits them. In the scene below, Ganon missed all three targets.
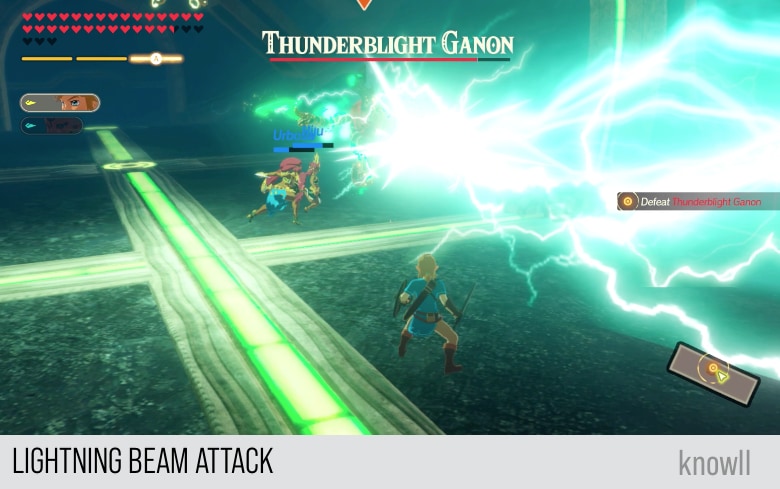
But in the scene below, he hits everyone, clearing the screen of all targets.
Maximize Your Character Potential
While playing the game, you will be unlocking a large number of Quests that can benefit your character. We listed below those kinds that will maximize the potential of your heroes.
Take note of those we highlighted in bold, as they are definitely combat-oriented and have a direct effect on the way you fight monsters.
Prioritize increasing the Rod uses. As we already shared, the Rods are the most powerful weapons in the game.
- Reduce Time Between Rune Uses
- Reduce Time Between Bomb Uses
- Reduce Time Between Statis Uses
- Reduce Time Between Magnesis Uses
- Reduce Time Between Cryonis Uses
- Increase Rod Uses by One
- Increase Hearts for All Characters
- Increase Apple Capacity
- Improved Depletion of Weak-Point Gauge
- Improved Special Attack-Gauge Recovery
- Improved Stager Resistance
- Improved Heart Recovery
- Reduced Enemy Damage by 5%
- Bonus Exp Earned from Enemies by 5%
- Learn Combat Oriented Recipes
- Increase Slots for Cooking
- Increase Weapon Capacity
Master Your Character
There is a total of 18 playable characters in the game, and each of them has unique attack combos, actions, and special attacks.
View our Characters Guide to master each of the available characters.
Master the Bosses
There is a total of 11 Bosses in the game, ranging from the main villains up to a few selected allies that you will fight only once.
View our Bosses Guide to gain mastery over all boss fights in the game.

Master Your Enemies
View our Enemies Guide so you can show them who is the real boss.